
Christopher J Ward
Engineer & Software
Developer
Christopher J Ward
Engineer & Software
Developer
If you find my code snippets helpful, please donate  (No obligation)
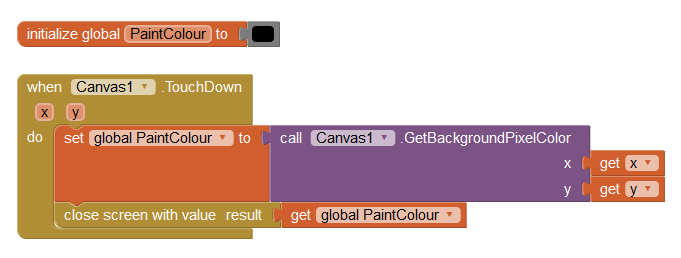
A nice way to present the User with a range of colours to paint with. It's effectively a DIY graphical List Picker. Requires very little code. This example will just paint dots on the canvas when touched.
This code snippet is a self-contained mini App. You can modify the code to suit your needs.
 Free Download
GUI
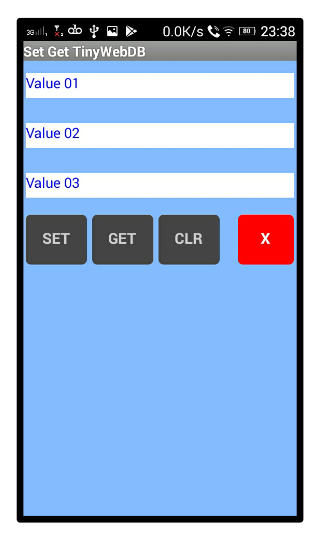
Screen 1 Painting Screen
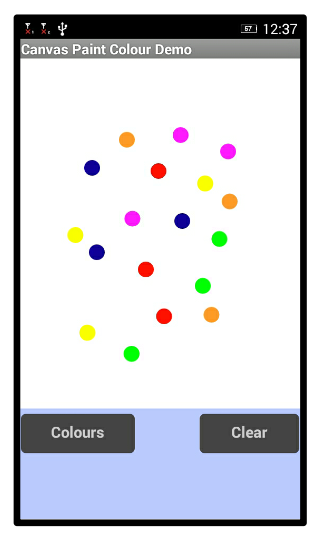
Screen Colour Picker

Blocks
Screen 1 Painting Screen
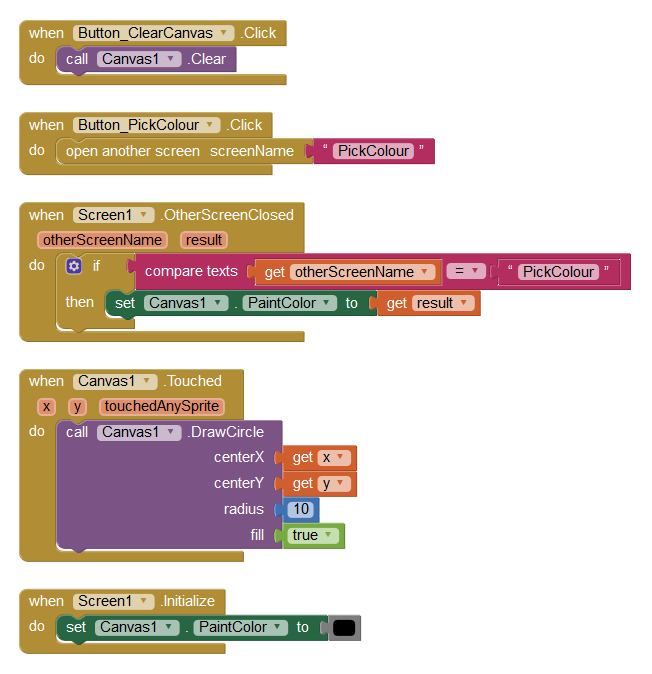
Screen Colour Picker
An easy way to make buttons look like and behave like Radio Buttons (Options). You can use your own Radio images, so not bound by any restrictions in terms of size, shape or colour.
This code snippet is a self-contained mini App. You can modify the code to suit your needs.
Free DownloadGUI
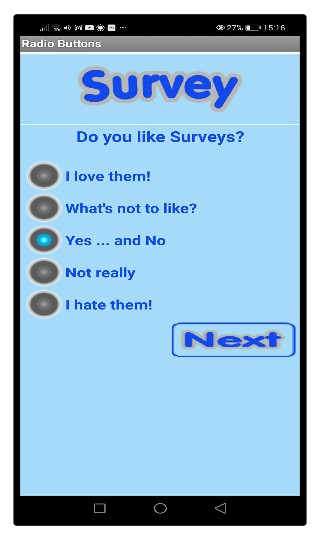
Blocks

 Radio Buttons In Action Movie
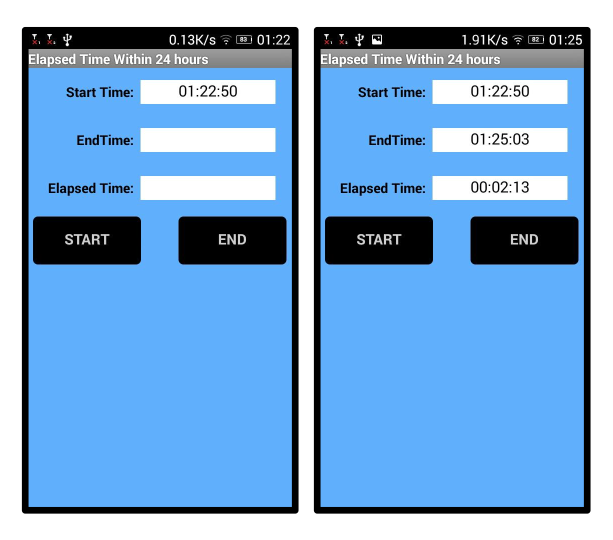
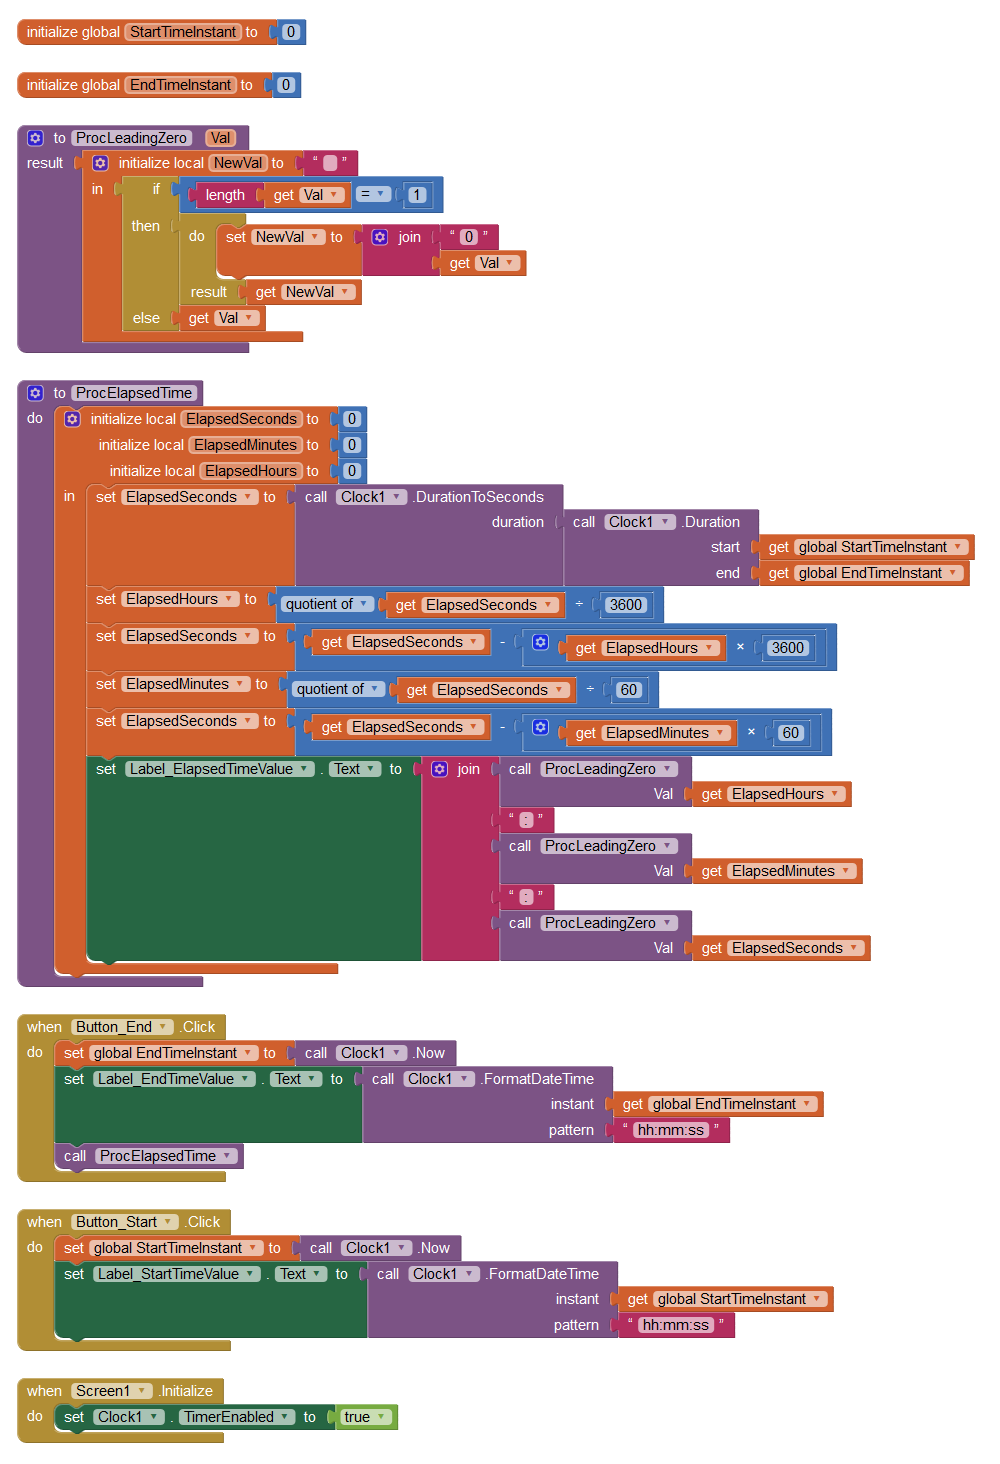
Returns the elapsed time between Start Time and End Time. Note, this example is suitable for short periods of time, the App has to keep running until the End Time. You can modify the code for long periods of time by saving the Start Time Instance in TinyDB and retreiving that value when the App is next opened.
This code snippet is a self-contained mini App. You can modify the code to suit your needs.
Free DownloadGUI
Blocks
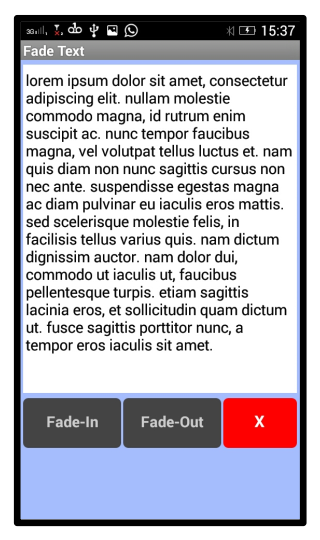
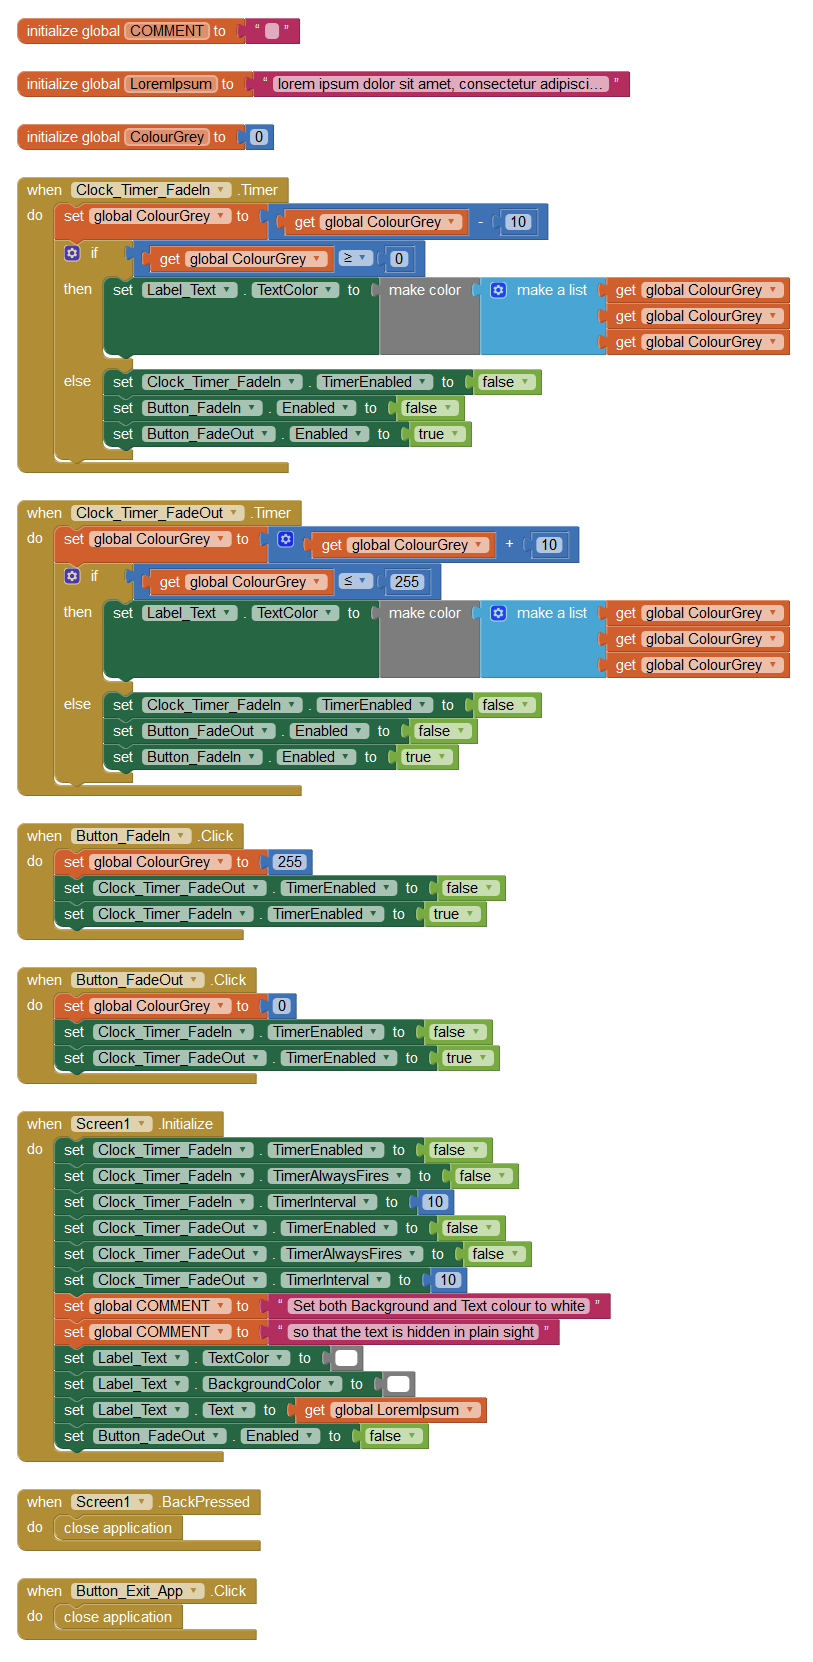
A neat way to fade (transition) text. Smooth as silk 
This code snippet is a self-contained mini App. You can modify the code to suit your needs.
Free DownloadGUI
Blocks
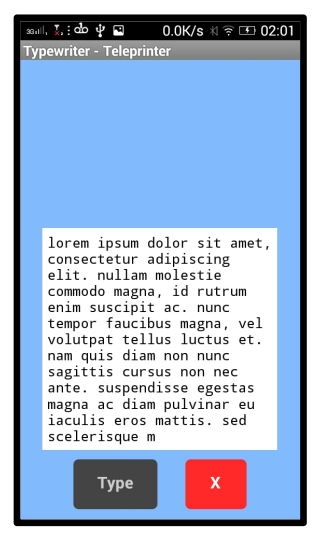
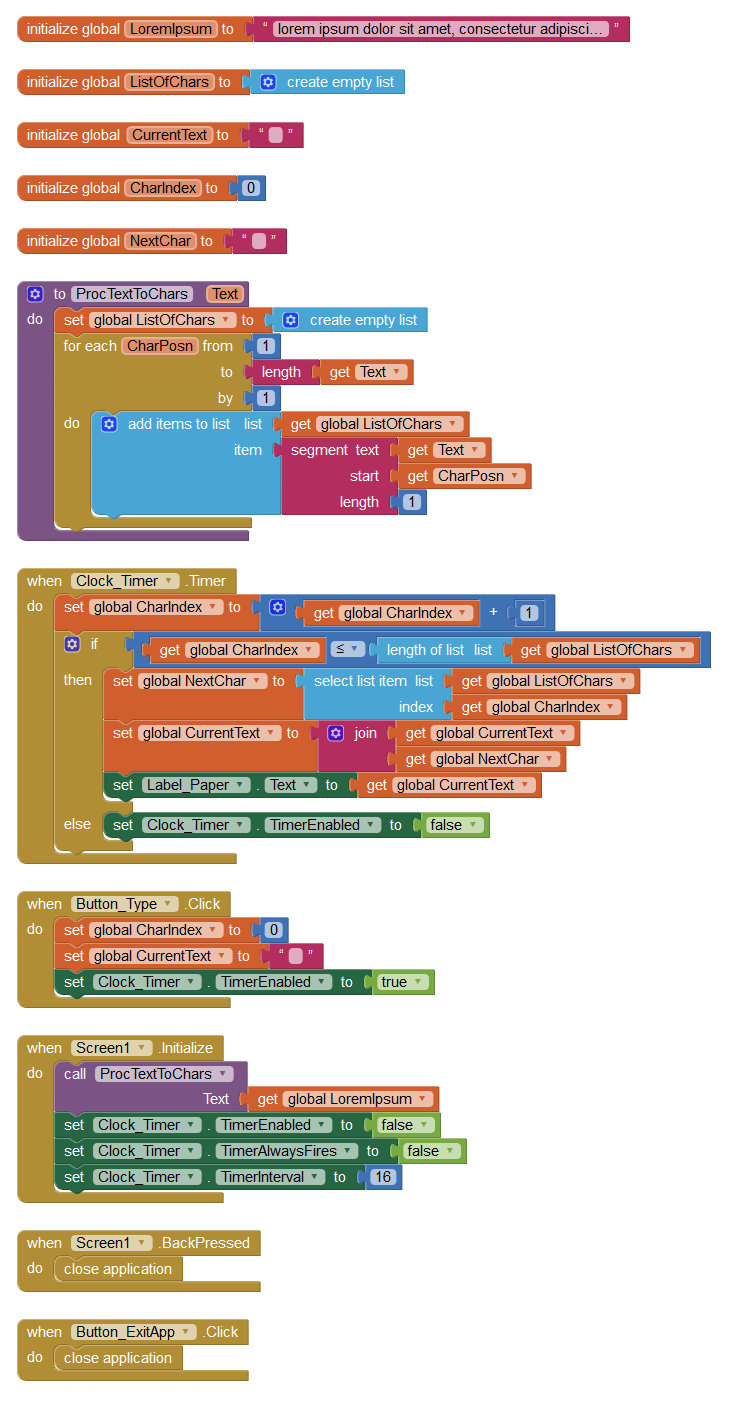
A simple way to display text character-by-character, with effect of the paper scrolling upwards.
This code snippet is a self-contained mini App. You can modify the code to suit your needs.
Free DownloadGUI
Blocks
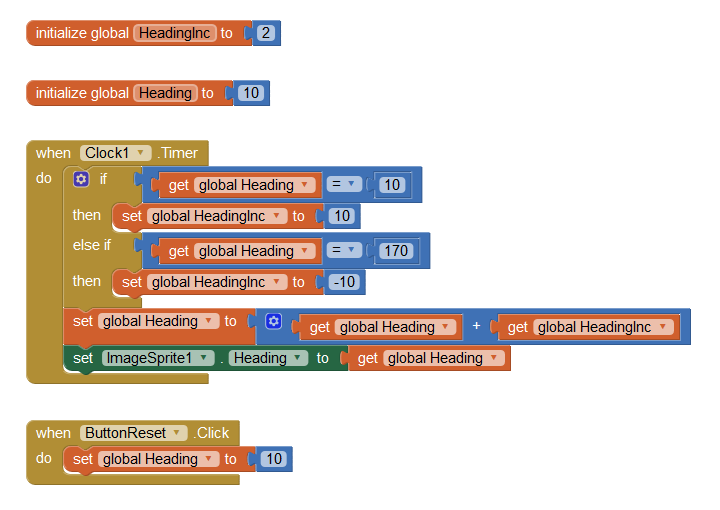
A Canvas-based Gauge where the pointer rotates according to input from the app or a microcontroller.
The code snippet is a self-contained mini App which you can easily copy to the BackPack and modify to work in your Apps.
Free Download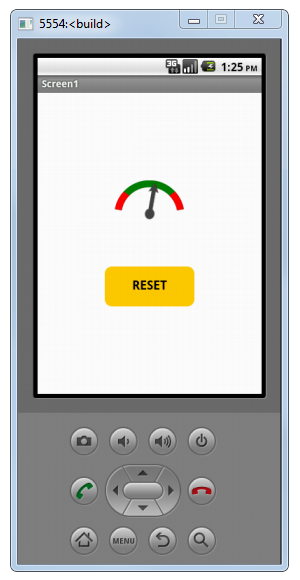
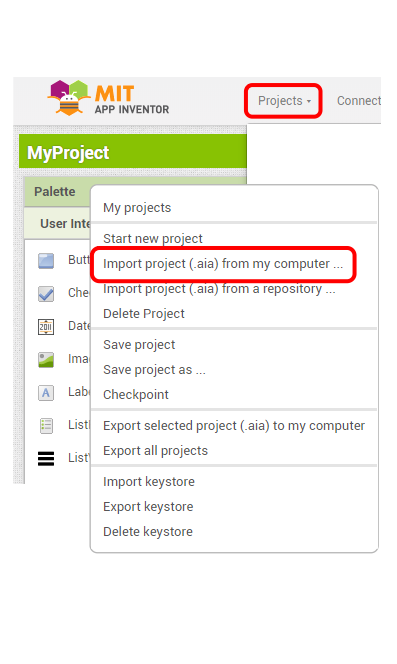
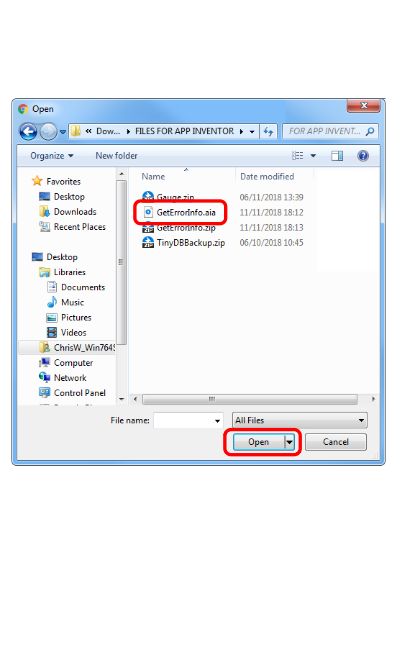
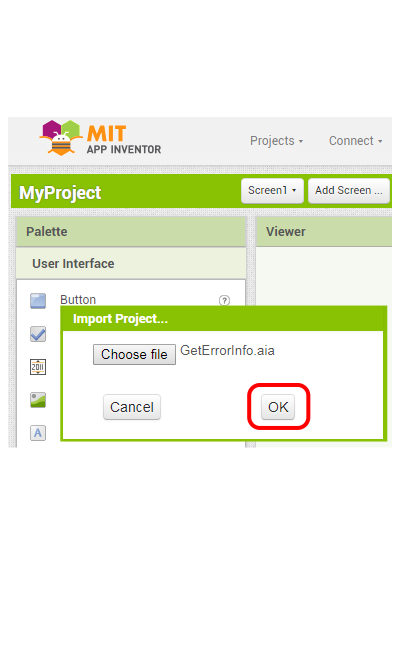
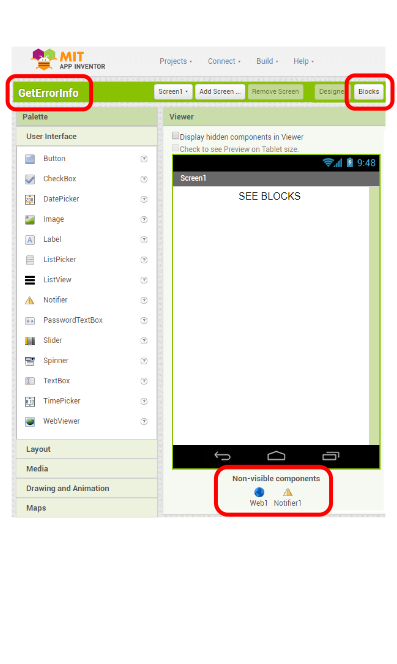
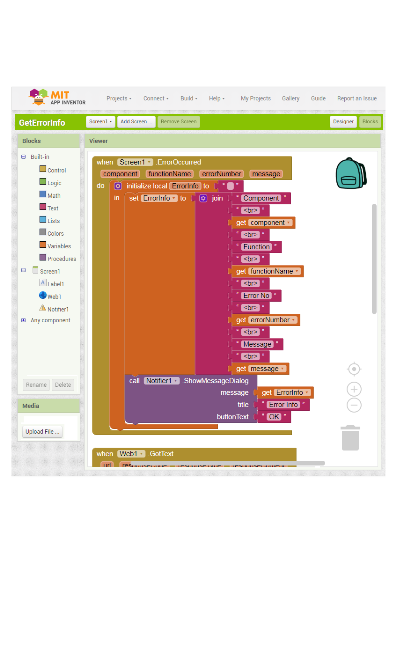
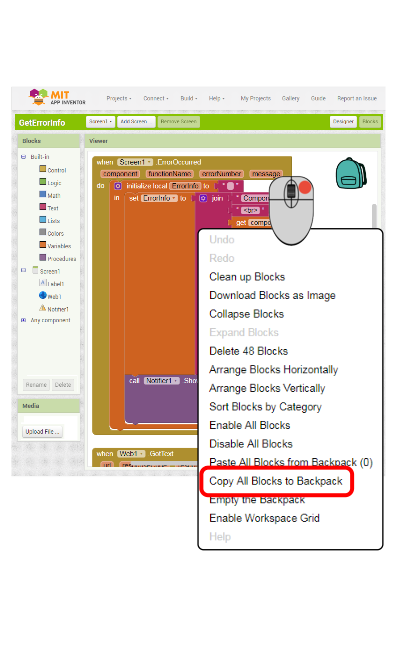
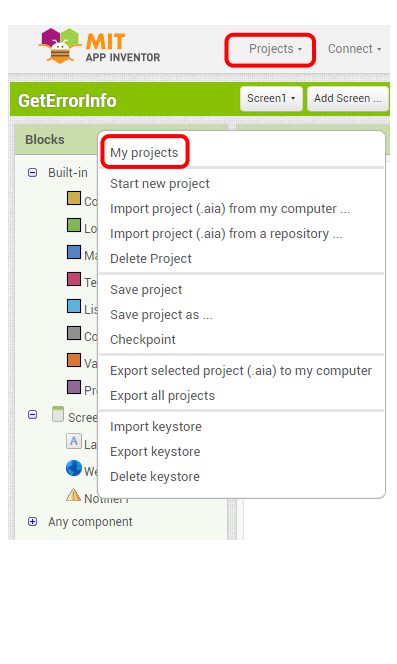
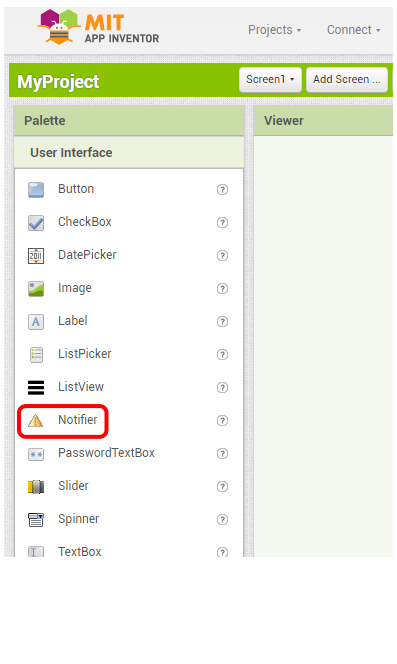
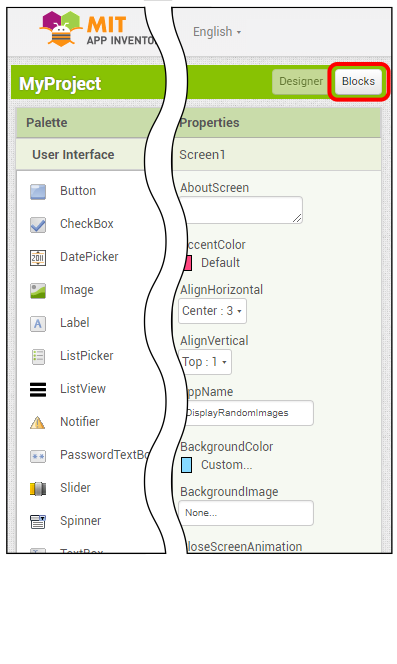
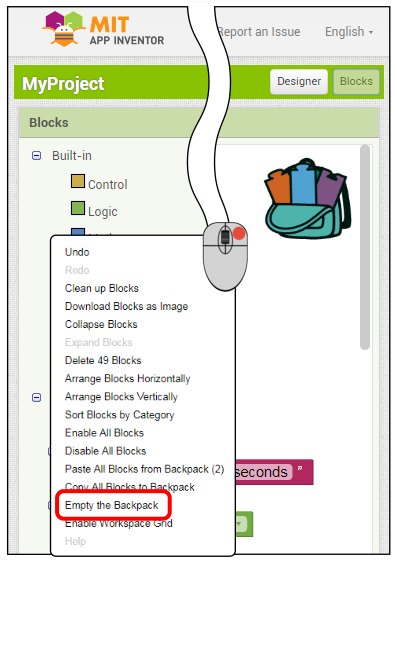
Copy-Paste these Blocks into your Blocks View - essential error information when debugging your code.
The code snippet is self-contained, you can easily copy to the BackPack and paste into your App.
See this web page for an easy to navigate list of Error Codes and their related information:
Professorcad: App Inventor Error Codes Free Download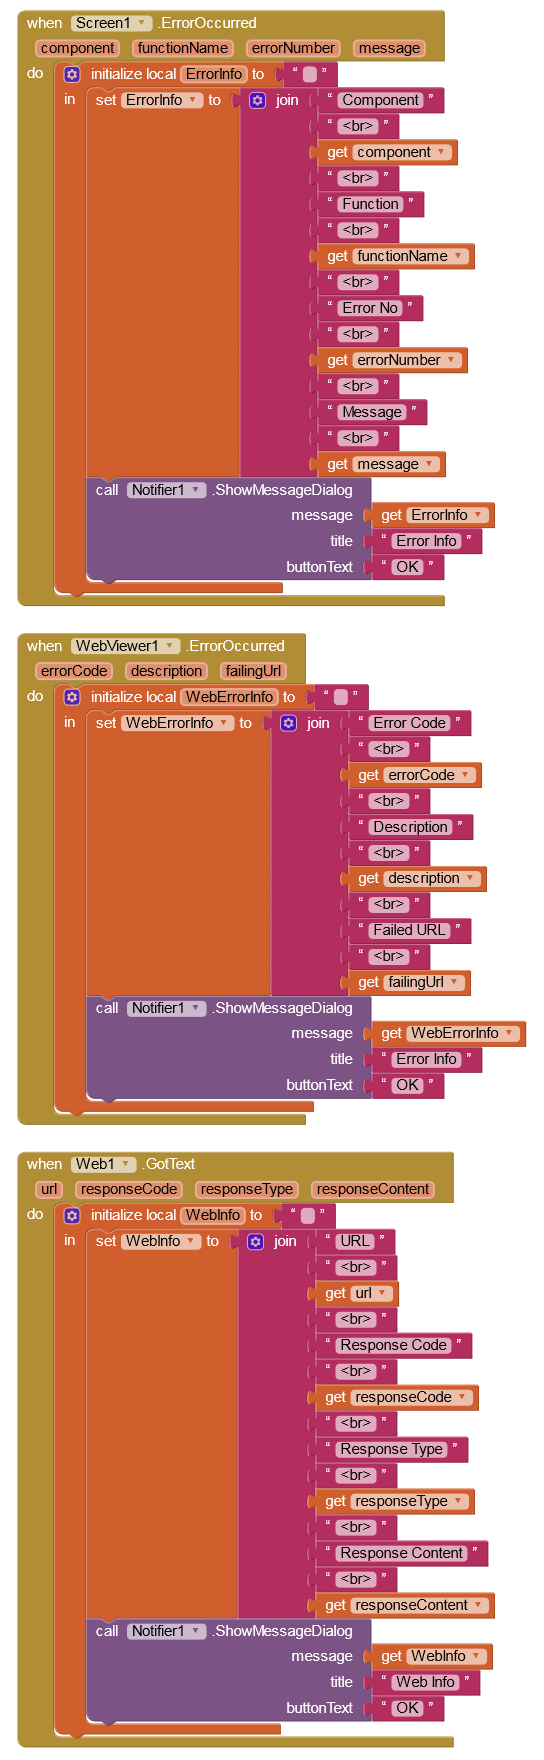
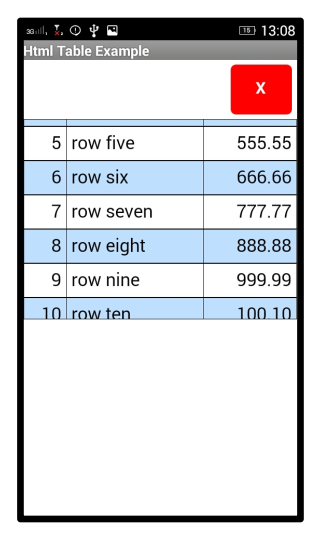
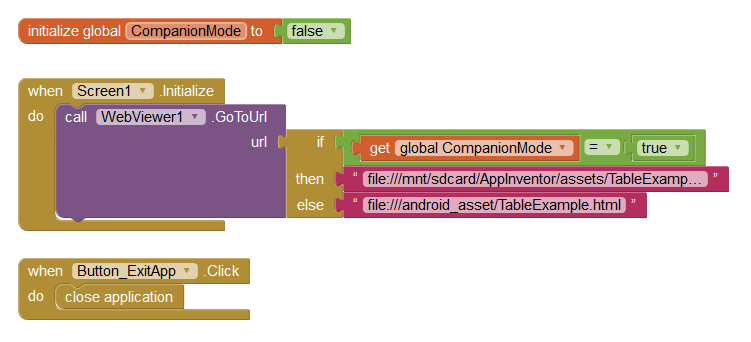
Need to present information in a table format? HTML is the answer! It is simple to create an HTML Table and Display it in a WebViewer Component.
The code snippet is a self-contained mini App which you can easily copy to the BackPack and cannibalise to work in your Apps.
The App Inventor Emulator cannot 'see' an HTML file, but the on-device Companion can. The path to the HTML file is different for the Companion and APK versions of your App, as shown in the Blocks Example.
Free DownloadScreen1 GUI
Screen1 Blocks
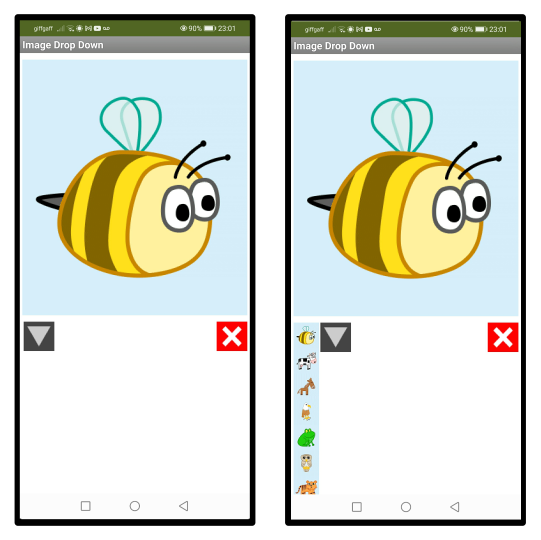
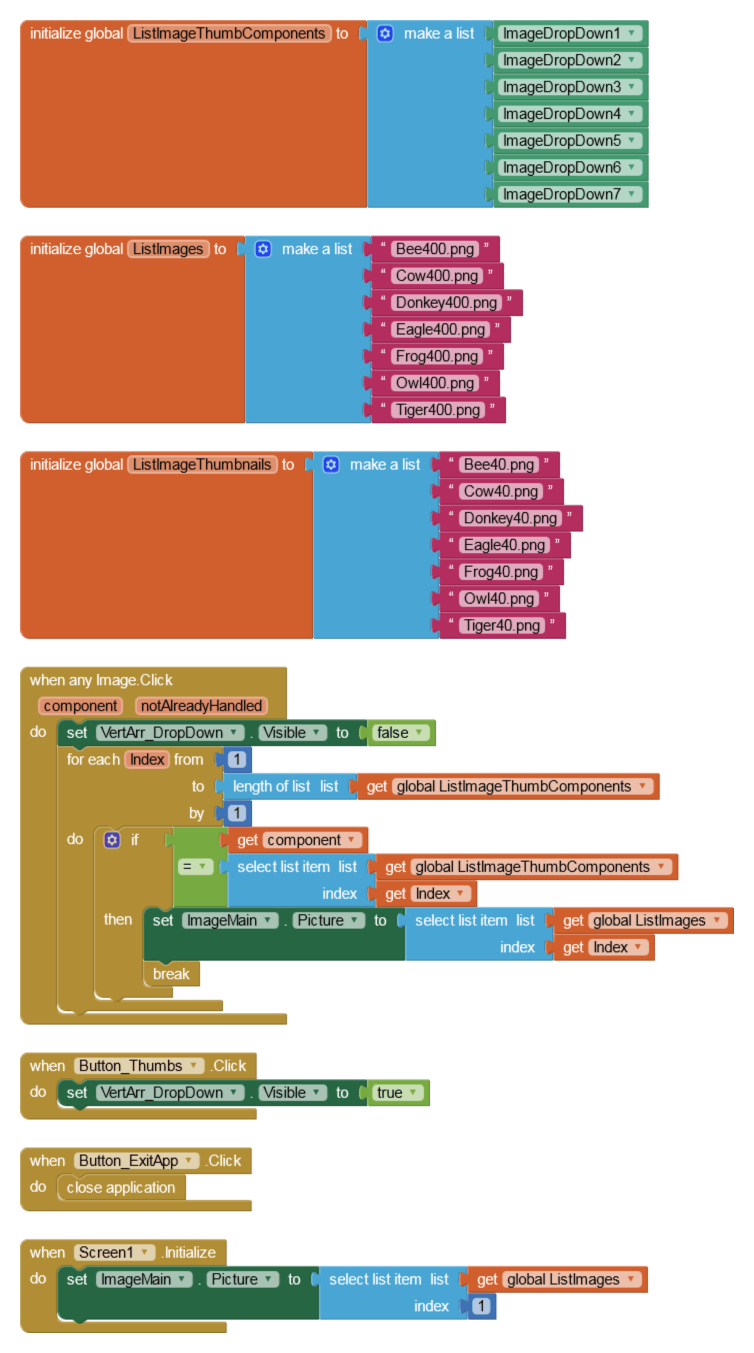
Here is a method that gives the User a drop-down list of image thumbnails and displays the image selected
The code snippet is a self-contained mini App which you can easily copy to the BackPack and cannibalise to work in your Apps.
The images in this example are stored within the App but if there are many images they should be downloaded to the App's ASD (App Specific Directory). Ensure your images are optimised for Android!
Free DownloadScreen1 GUI
Screen1 Blocks
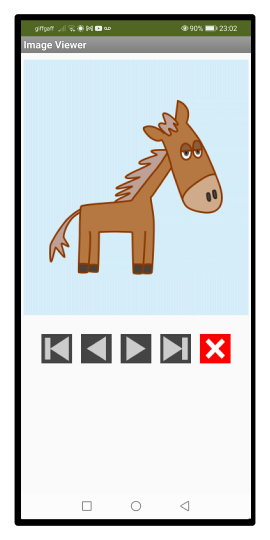
Here is a method that gives the User a traditional way of browsing images
The code snippet is a self-contained mini App which you can easily copy to the BackPack and cannibalise to work in your Apps.
The images in this example are stored within the App but if there are many images they should be downloaded to the App's ASD (App Specific Directory). Ensure your images are optimised for Android!
Free DownloadScreen1 GUI
Screen1 Blocks
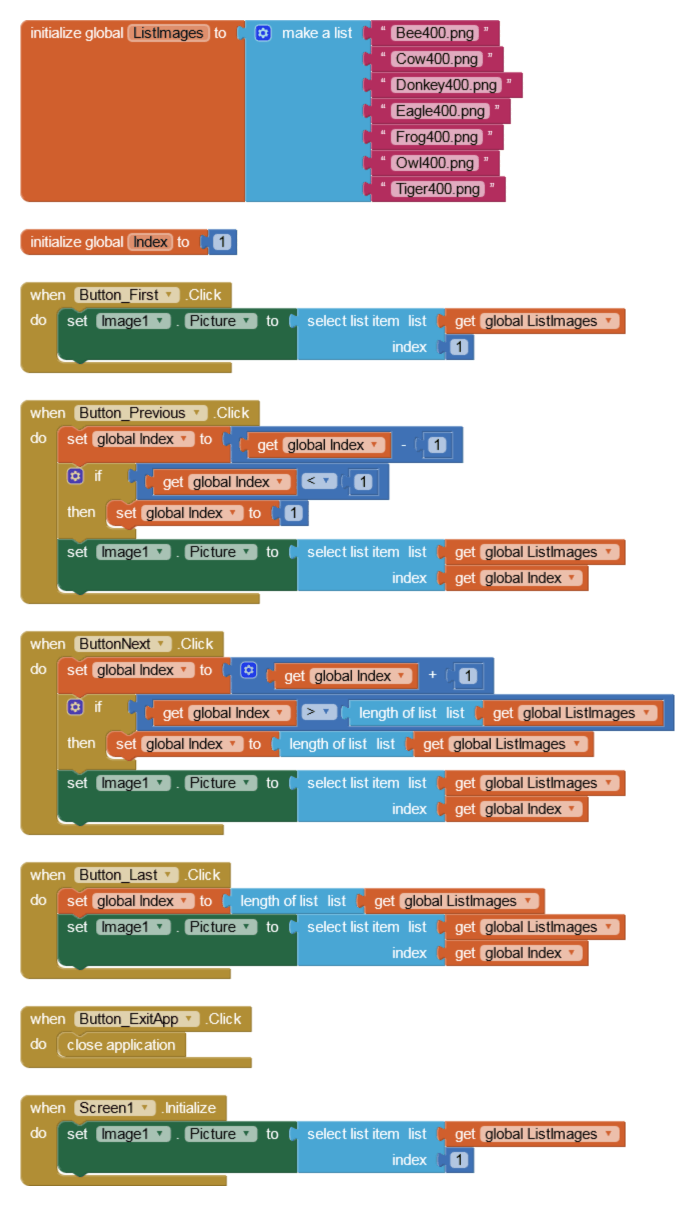
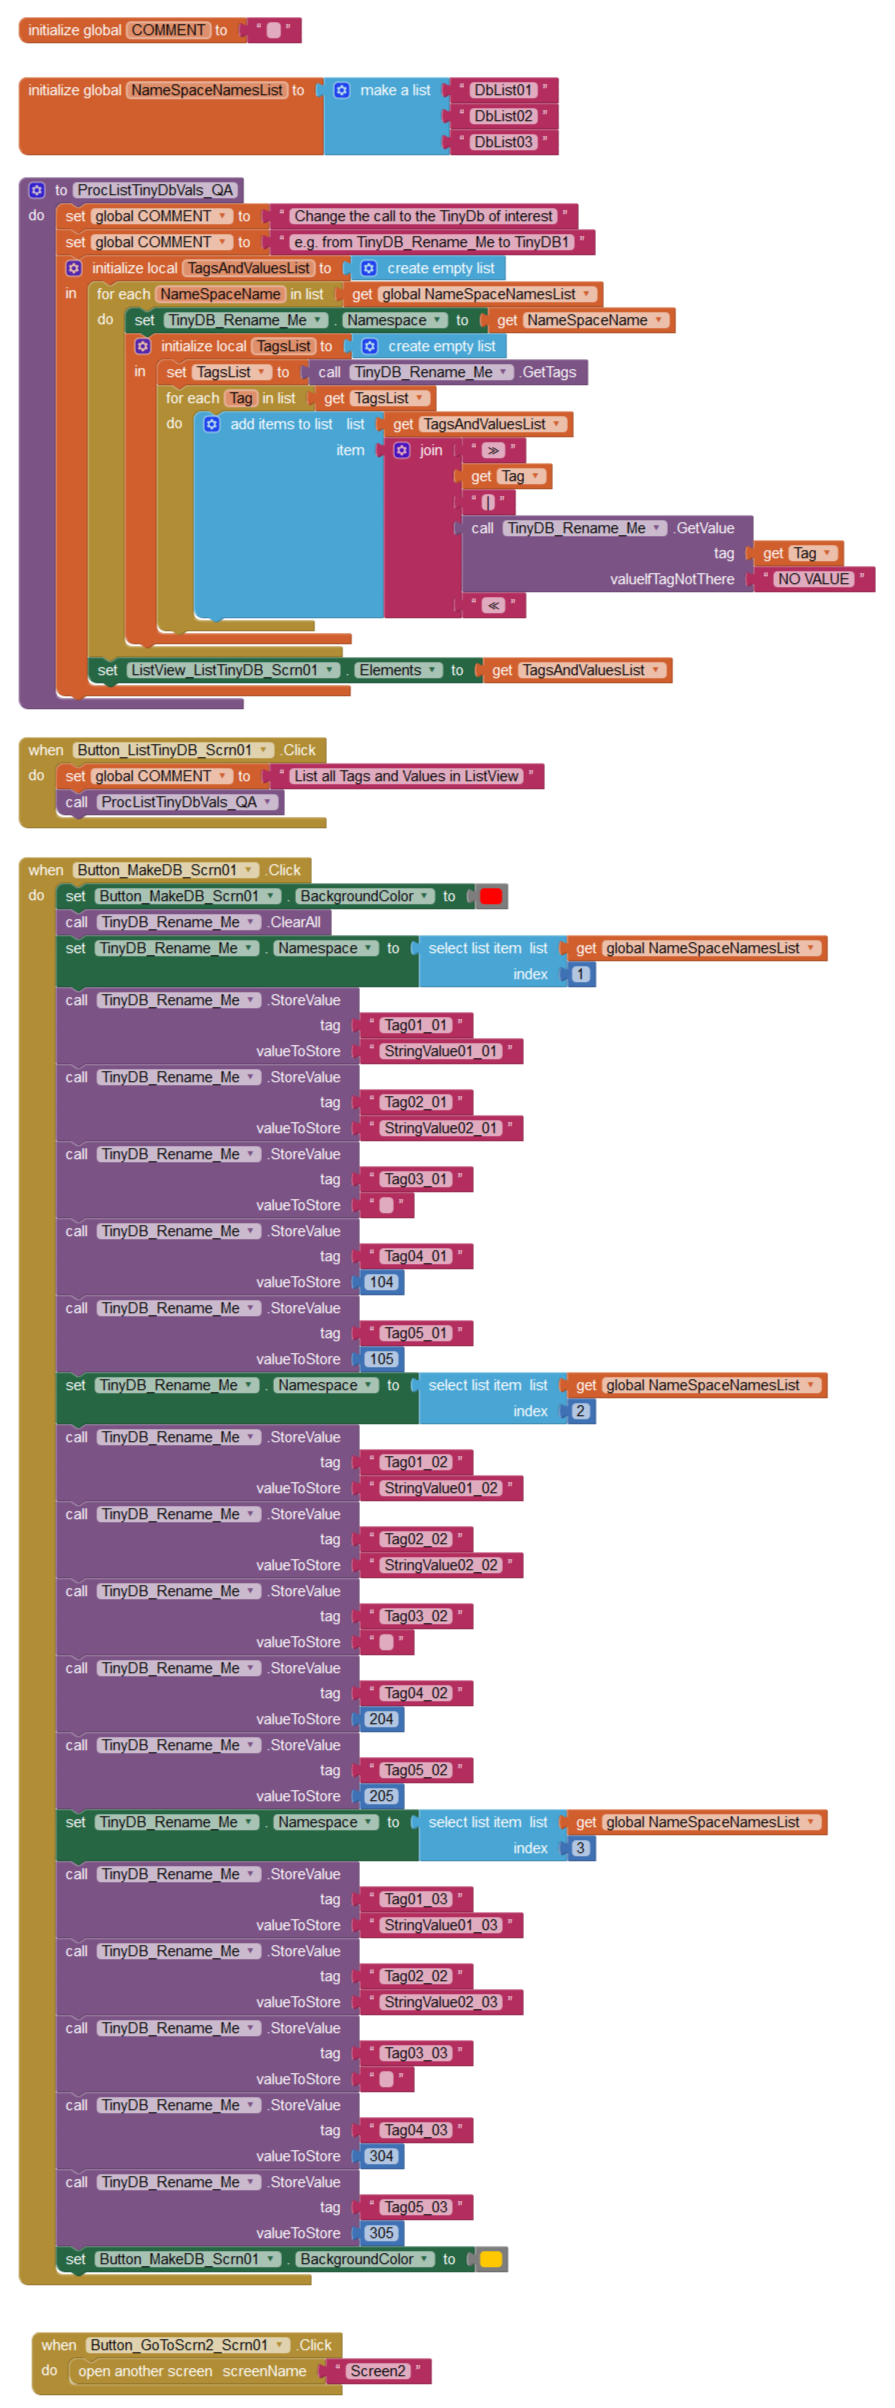
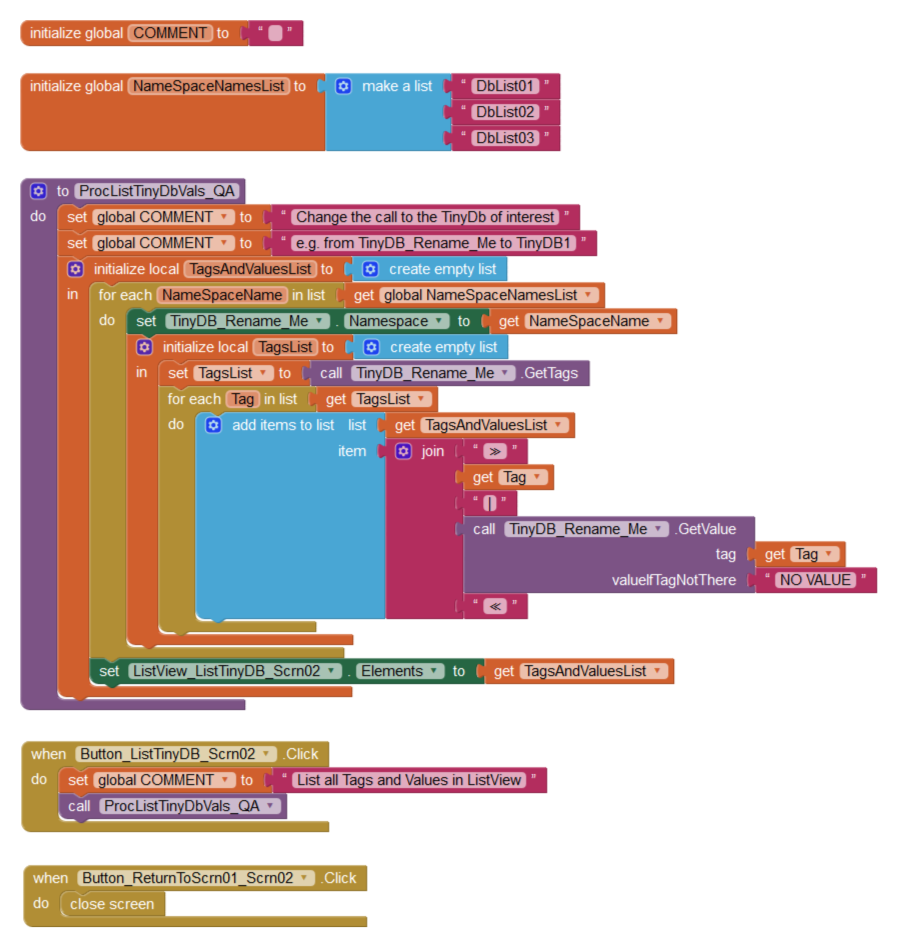
You could think of a Namespace as being a box. If you have several boxes (Namespaces), it makes sense to store related items in each.
For example: a box for shoes, a box for toys, a box for books and so on.
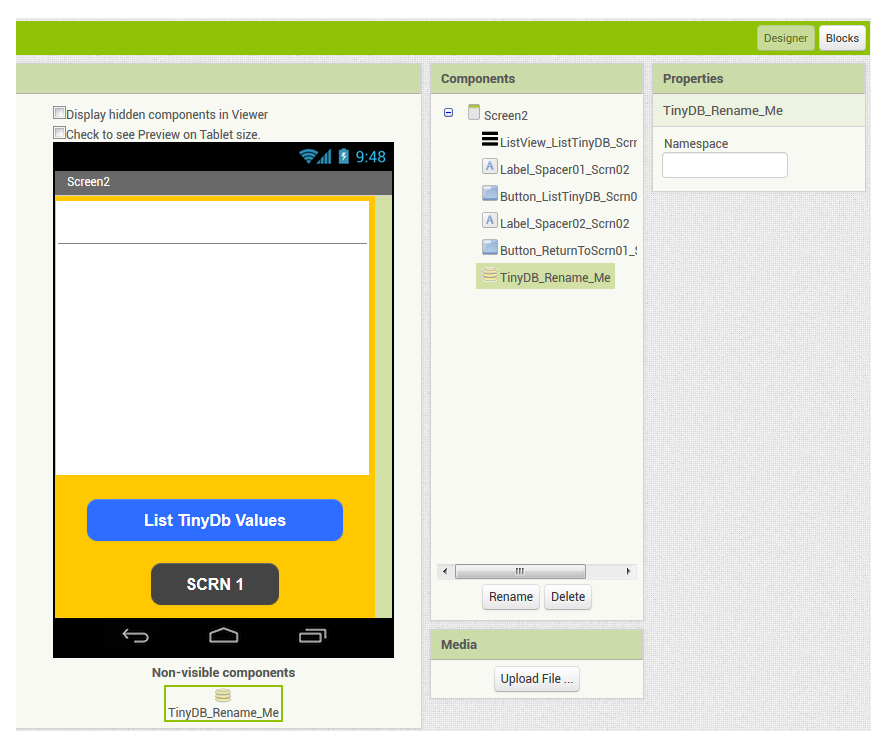
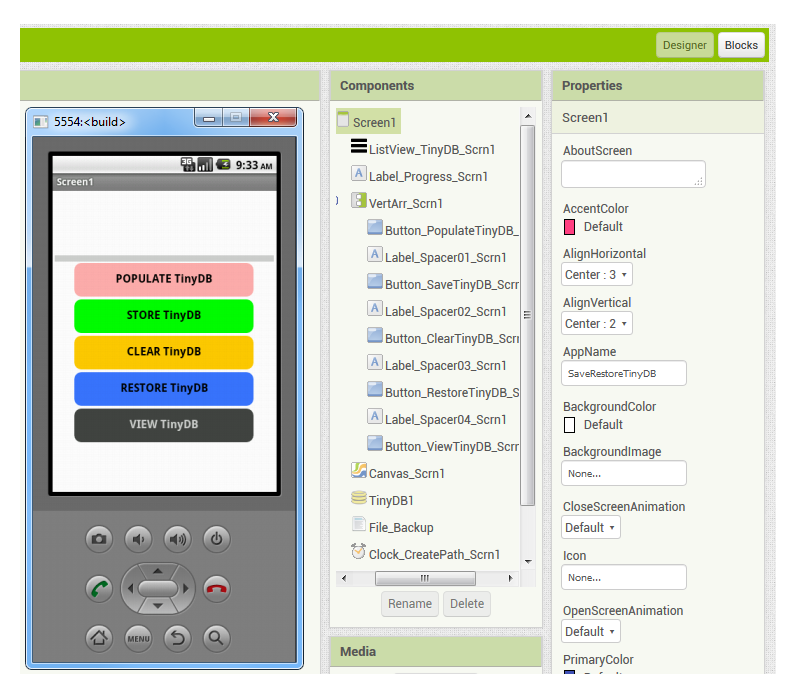
The code snippet is a self-contained mini App. On Screen1 we populate the TinyDB using 3 Namespaces. On Screen2 we populate a ListView from the TinyDB to prove that both Screens "see" the same TinyDB (ensure the name given to TinyDB is identical on each Screen!).
Note: When using Multiple NameSpaces, the Namespace TextBox in the Properties Palette should be empty - NameSpace names are defined in the Blocks Code. Also note how much of the code on Screen2 is similar to Screen1. This is an alarm bell telling us the code is inefficient! What we should consider instead is to use Virtual Screens.
Free DownloadScreen1 GUI
Screen1 Blocks
Screen2 GUI
Screen2 Blocks
You might need to backup your TinyDb data because if, for example, your app is uninstalled or overwritten, TinyDb data will be lost.
Note, code applies to Android v4.2 to v9. Android v10 and above cannot create or save external folders and files (Google Security Measure).
The code snippet is a self-contained mini App for you to play with as-is to get an understanding of how Store-Restore of data works. It is necessary to save the file on the virtual SD drive, since it would otherwise be lost in the same scenario that would lose TinyDB.
Free DownloadScreen1 GUI
Screen1 Blocks

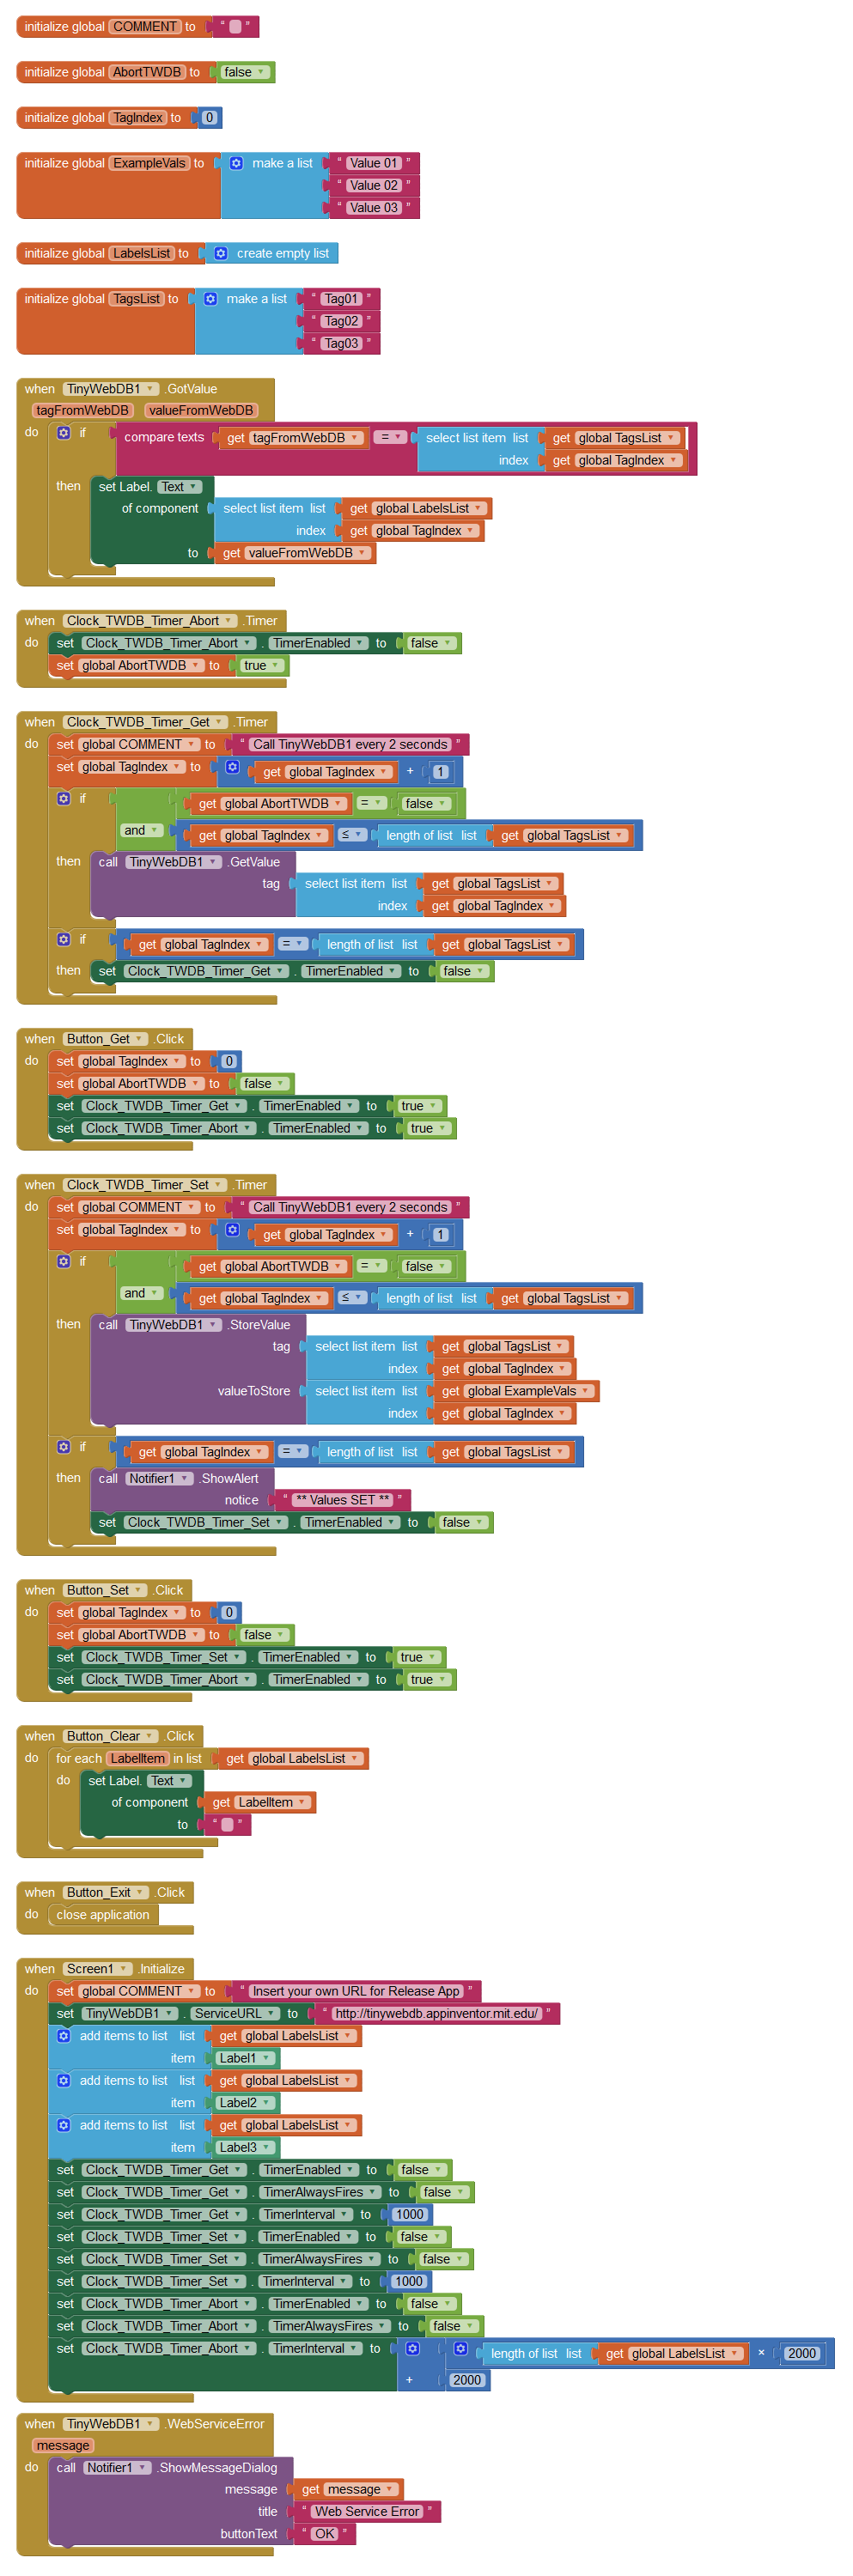
The TinyWebDB, as the name suggests, is a small Database (XML) you can store on your Web Server.
Setting (Saving) and Getting (Restoring) Values from TinyWebDB requires the use of Clock Timers, because the upload/download of values is not instantaneous.
This code snippet is a self-contained mini App, using MIT's TinyWebDB Server.
You can modify the code to suit your needs (most especially, you will need to use your own Web Server for your Released App).
Free DownloadGUI
Blocks
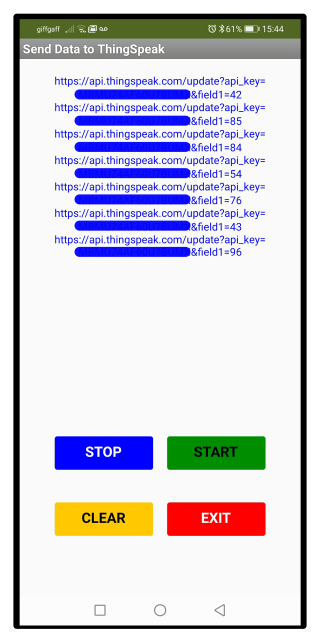
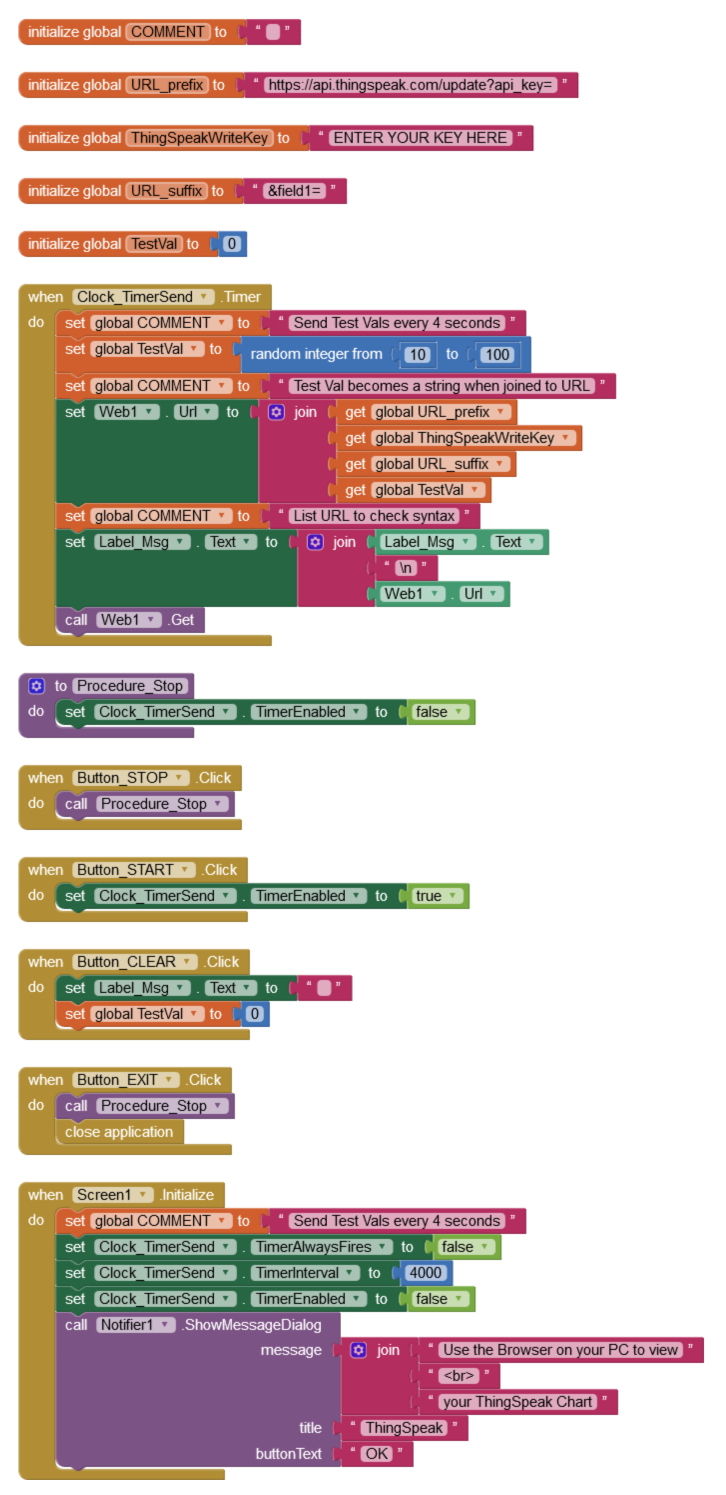
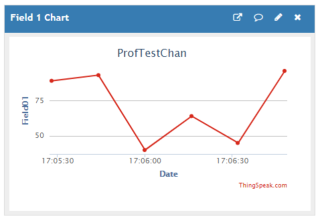
ThingSpeak is a Service for Iot Projects, most often used to chart data for people to see on the Internet
Sending values requires the use of Clock Timers, because the upload of values is not instantaneous in the free version of ThingSpeak.
This code snippet is a self-contained mini App, using HTTP Get and random numbers to draw a simple Chart. A typical use would be to collect sensor values from a microprocessor (e.g. Arduino)
You can modify the code to suit your needs. Note that syntax has to be 100% correct or the stream to ThingSpeak will fail!
Free DownloadGUI
Blocks
Chart
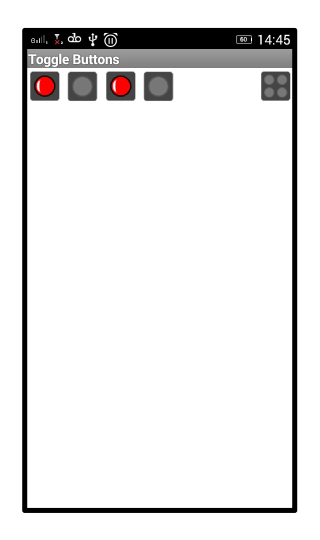
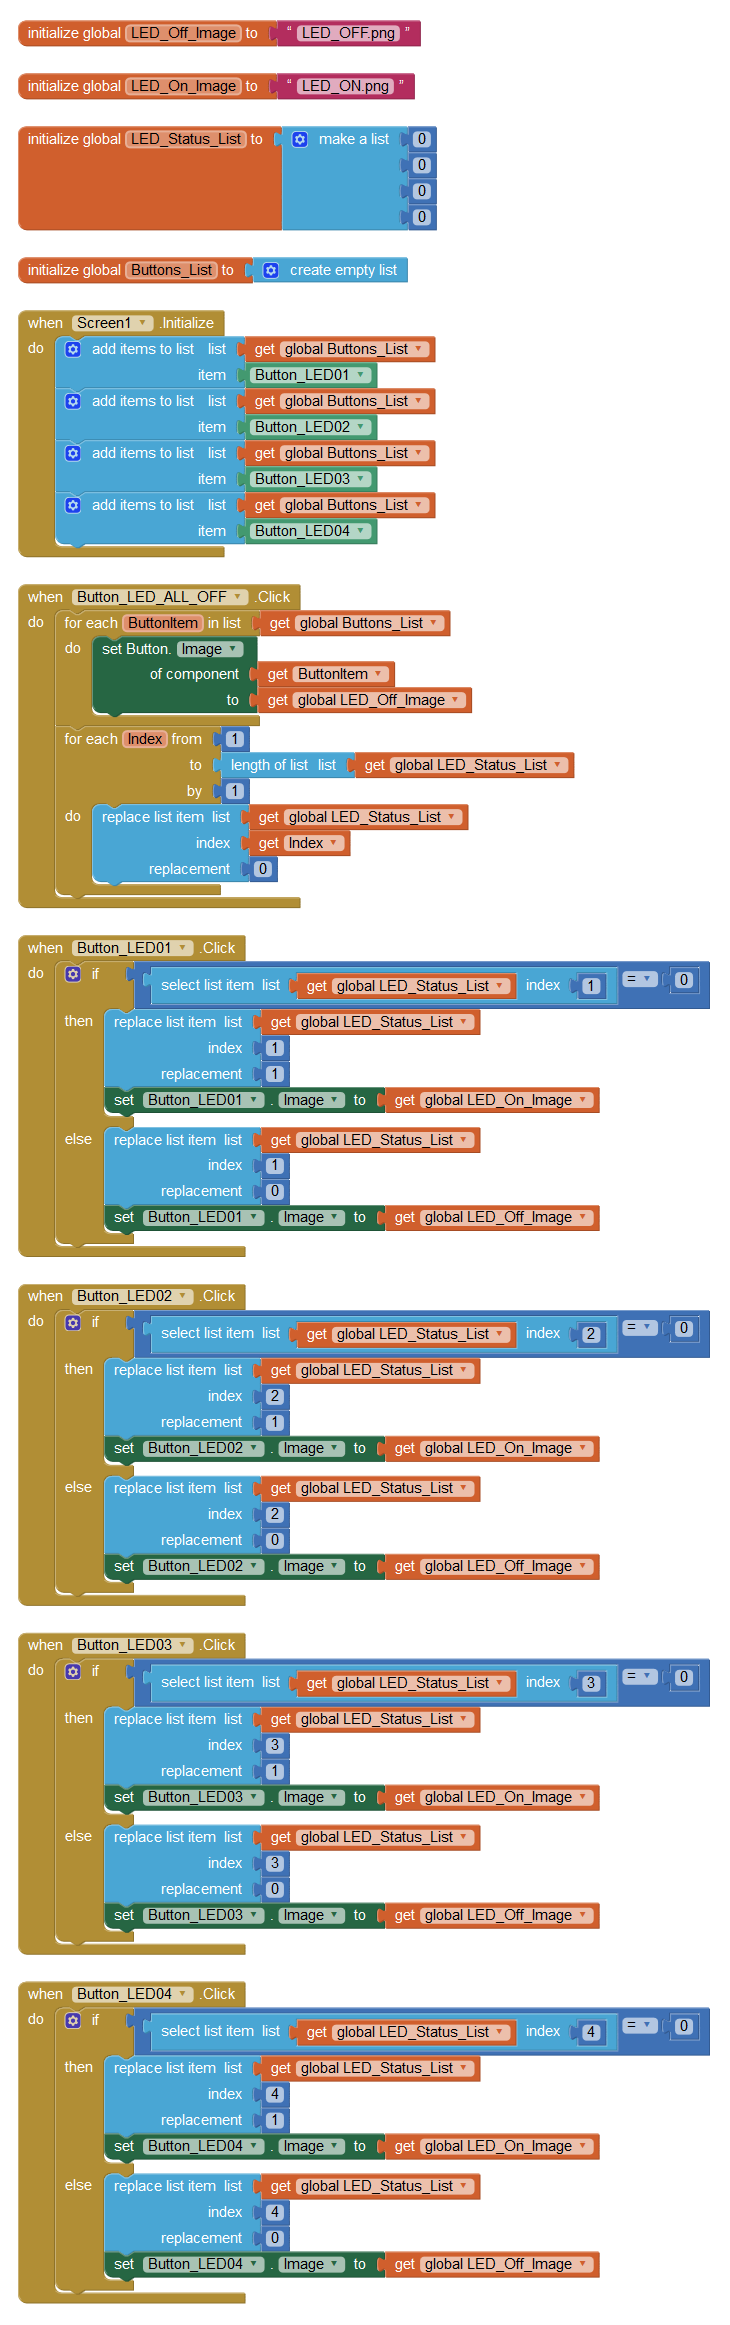
It is said that "A Picture Paints a Thousand Words". Image buttons can make your GUI easier to understand and use.
Re the GUI image below, there are four individual Toggle Buttons, plus (on the right) a Button to toggle all four off. It is very easy to add more buttons and that could of course include an "All On" Button.
This code snippet is a self-contained mini App which shows a simple way to control the toggling (on-off effect) of Image Buttons. The Code refers to LEDs - a commonplace requirement when learning how to control an Ardunio Microprocessor is the ability to switch LEDs on and off.
You can modify the code to suit your needs.
Free DownloadGUI
Blocks
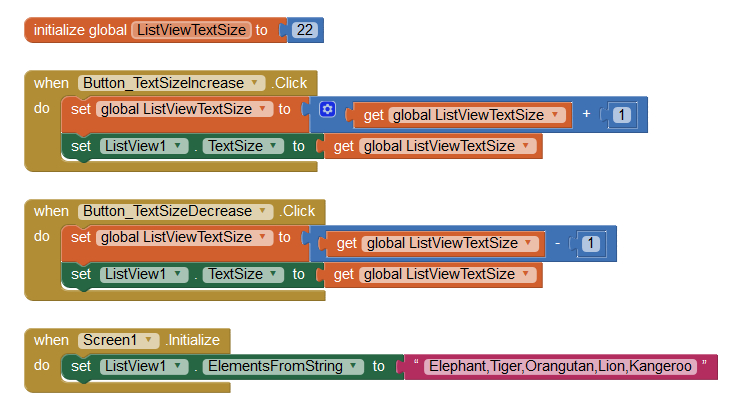
Across devices, there are massive differences in screen resolution. This can have a negative effect on text size.
This code snippet is a self-contained mini App which shows a simple way to give the User control of ListView Text size.
Free DownloadGUI
Blocks
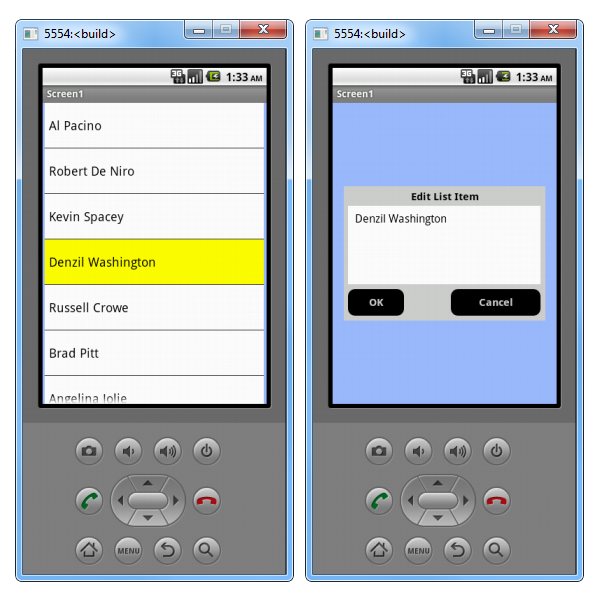
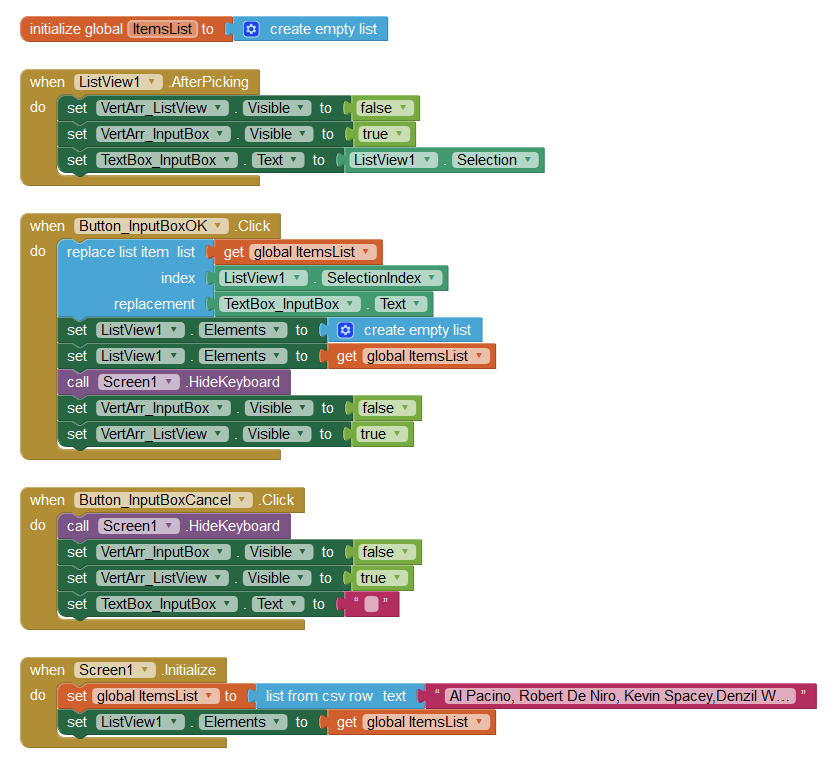
There are times when your User needs to edit one or more items in a ListView. Sometimes, the ListView is presented solely for the perpose of editing a List.
This code snippet is a self-contained mini App which shows a simple way to offer the User an InputBox with the List Item Text pre-set ready for modification.
You can modify the code to suit your needs.
Free DownloadGUI
Blocks
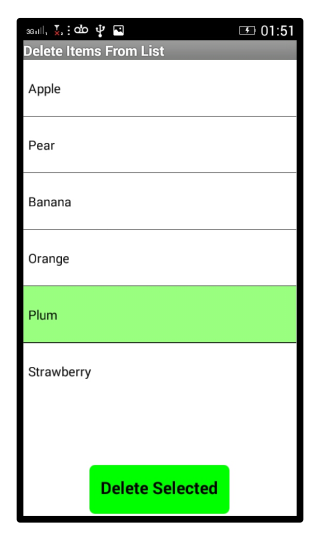
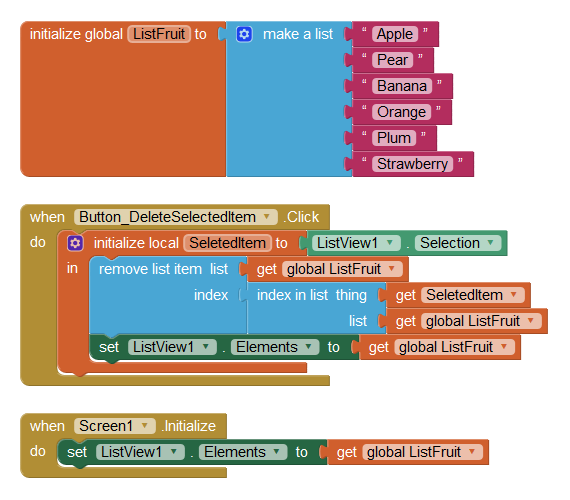
So, how do we allow the User to delete Items (Rows) from a ListView? Let's start by explaining how not to do it! We should not delete Items by Index Number:
Example Original List:
List after Deletion of Index 5 (Plum):
Now, having deleted Index 5, Index 6 no longer exists but Index 5 still does
This is because the List is re-indexed now it is shorter. If we tried deleting "Strawberry" using it's original Index (6), an error would occure because it has a new Index now (5).
So how do we safely delete Items? By finding the Item by Name, so we are sure to get the Item's new (current) Index.
This code snippet is a self-contained mini App which demonstrates a run-time method to allow the User to delete Items.
You can modify the code to suit your needs.
Free DownloadGUI
Blocks
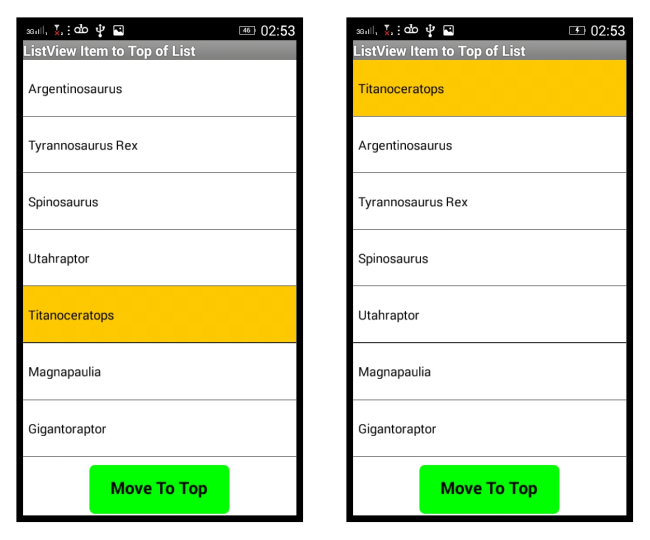
Allow the User to move a Selected ListView Item to the top of the List.
This code snippet is a self-contained mini App.
You can modify the code to suit your needs.
Free DownloadGUI
Blocks
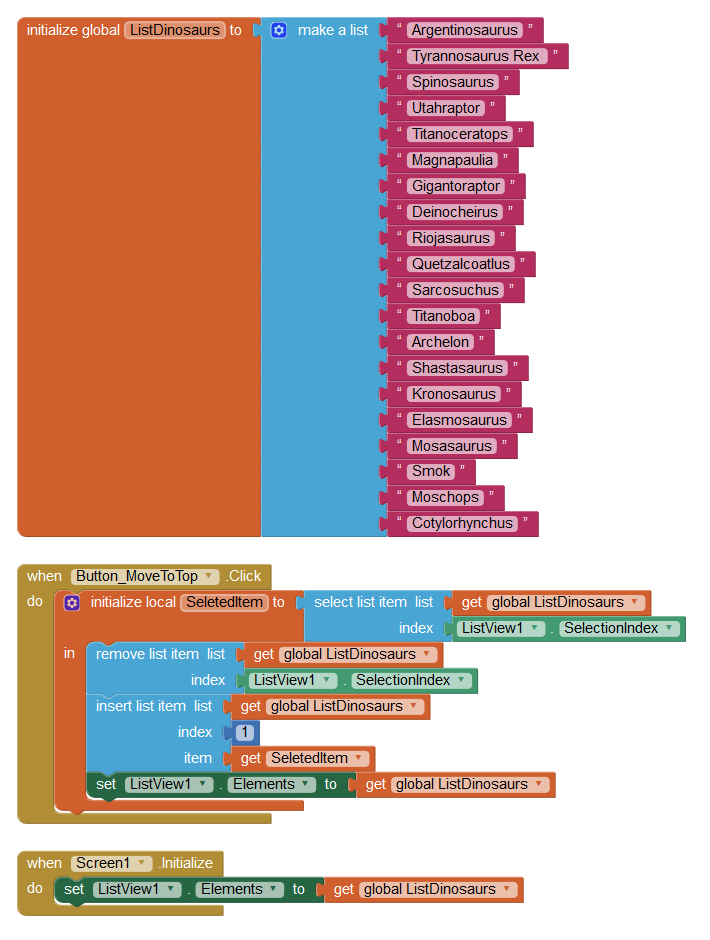
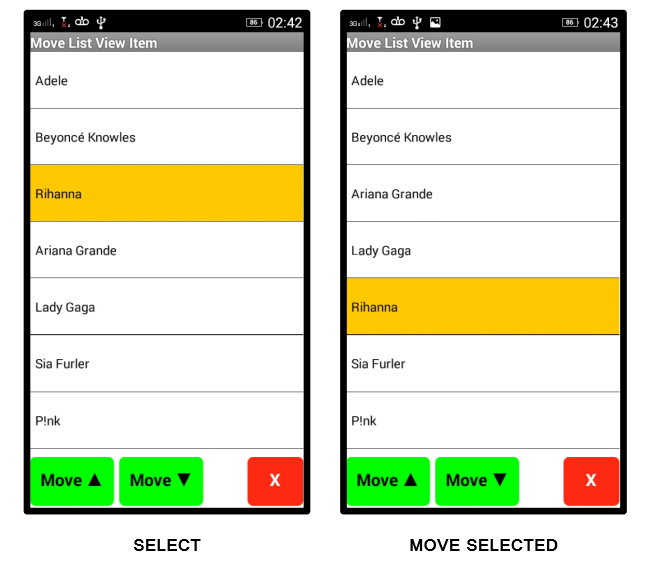
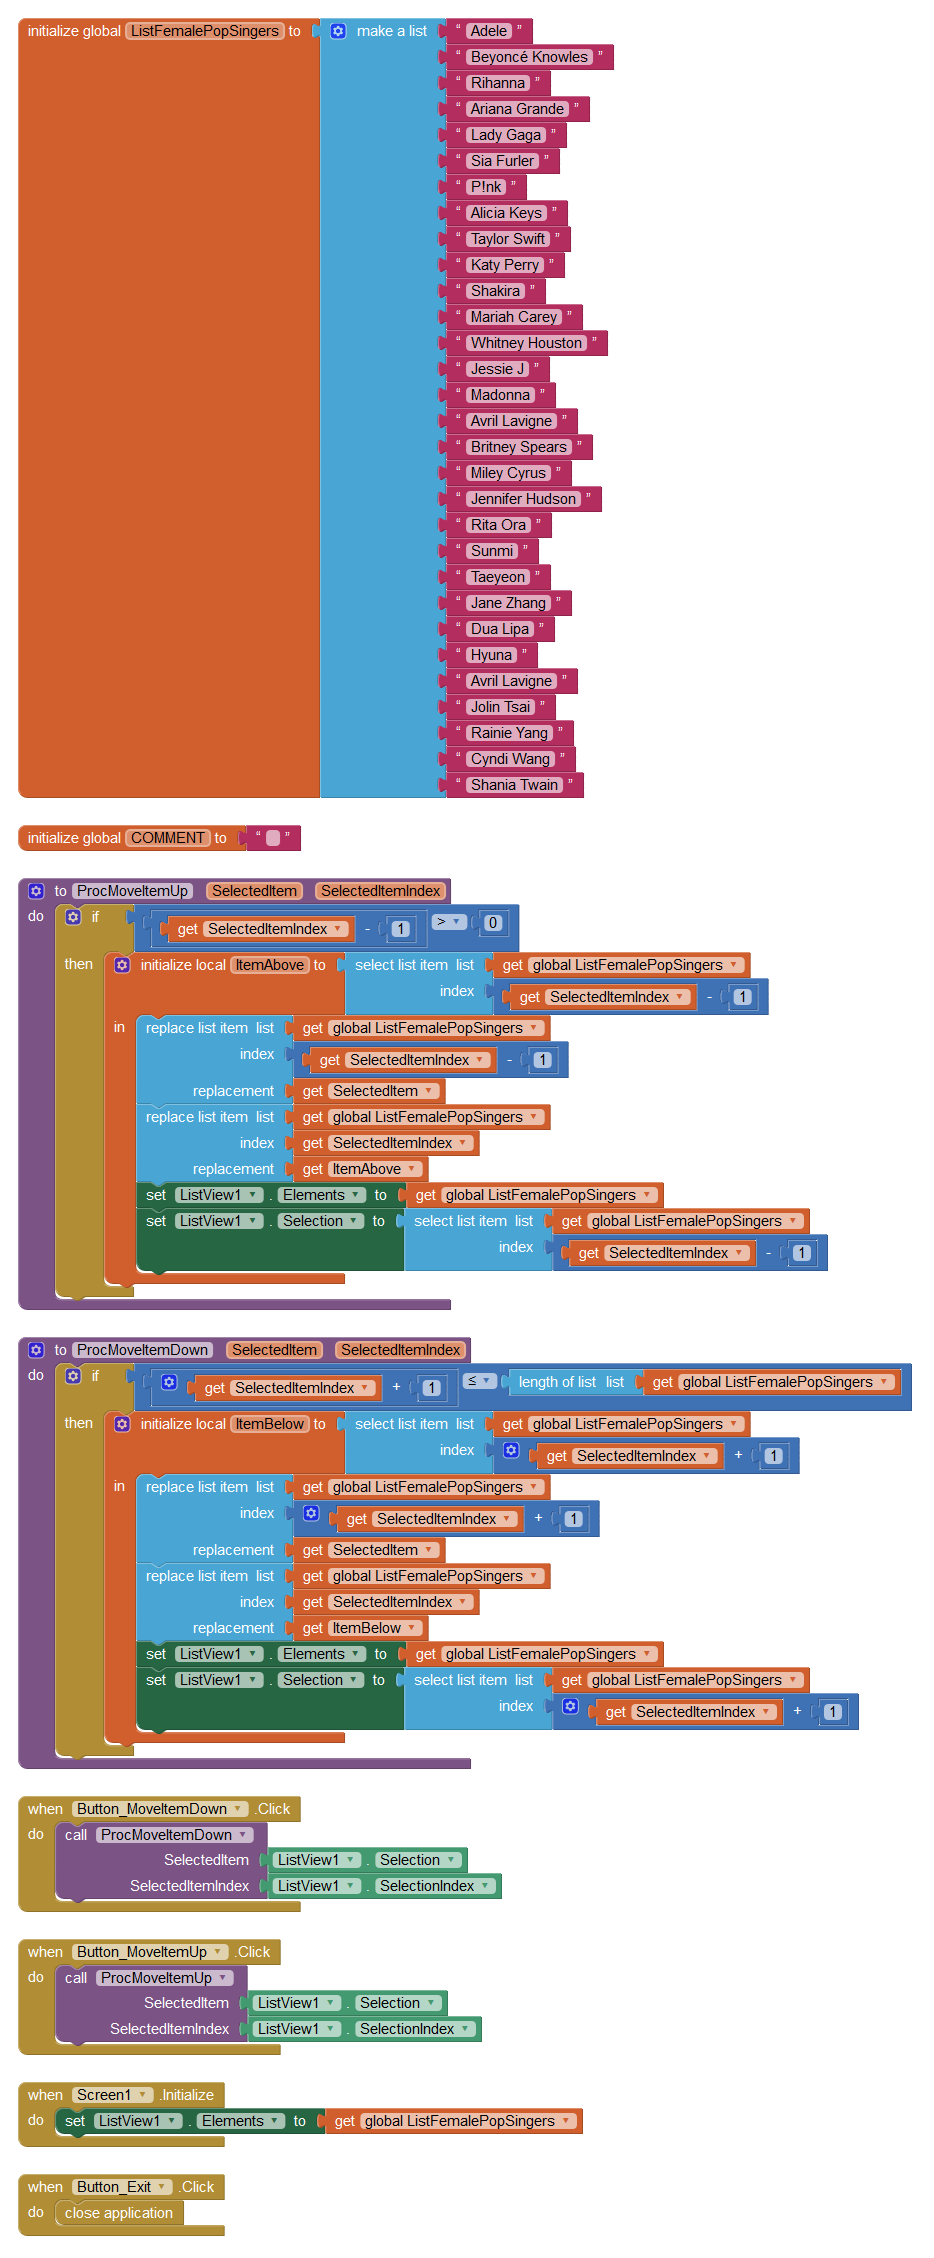
Allow the User to Move a ListView Item (Row), up or down, row by row.
Note, the moved item in the screenshot is highlighted, but actually a programmatically moved Item does not get highlighted :(
This code snippet is a self-contained mini App.
You can modify the code to suit your needs.
Free DownloadGUI
Blocks
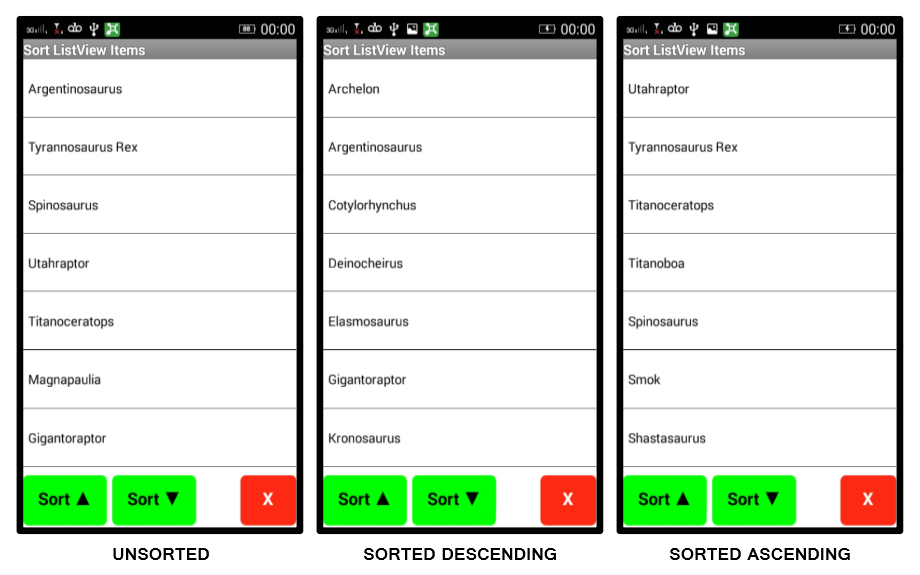
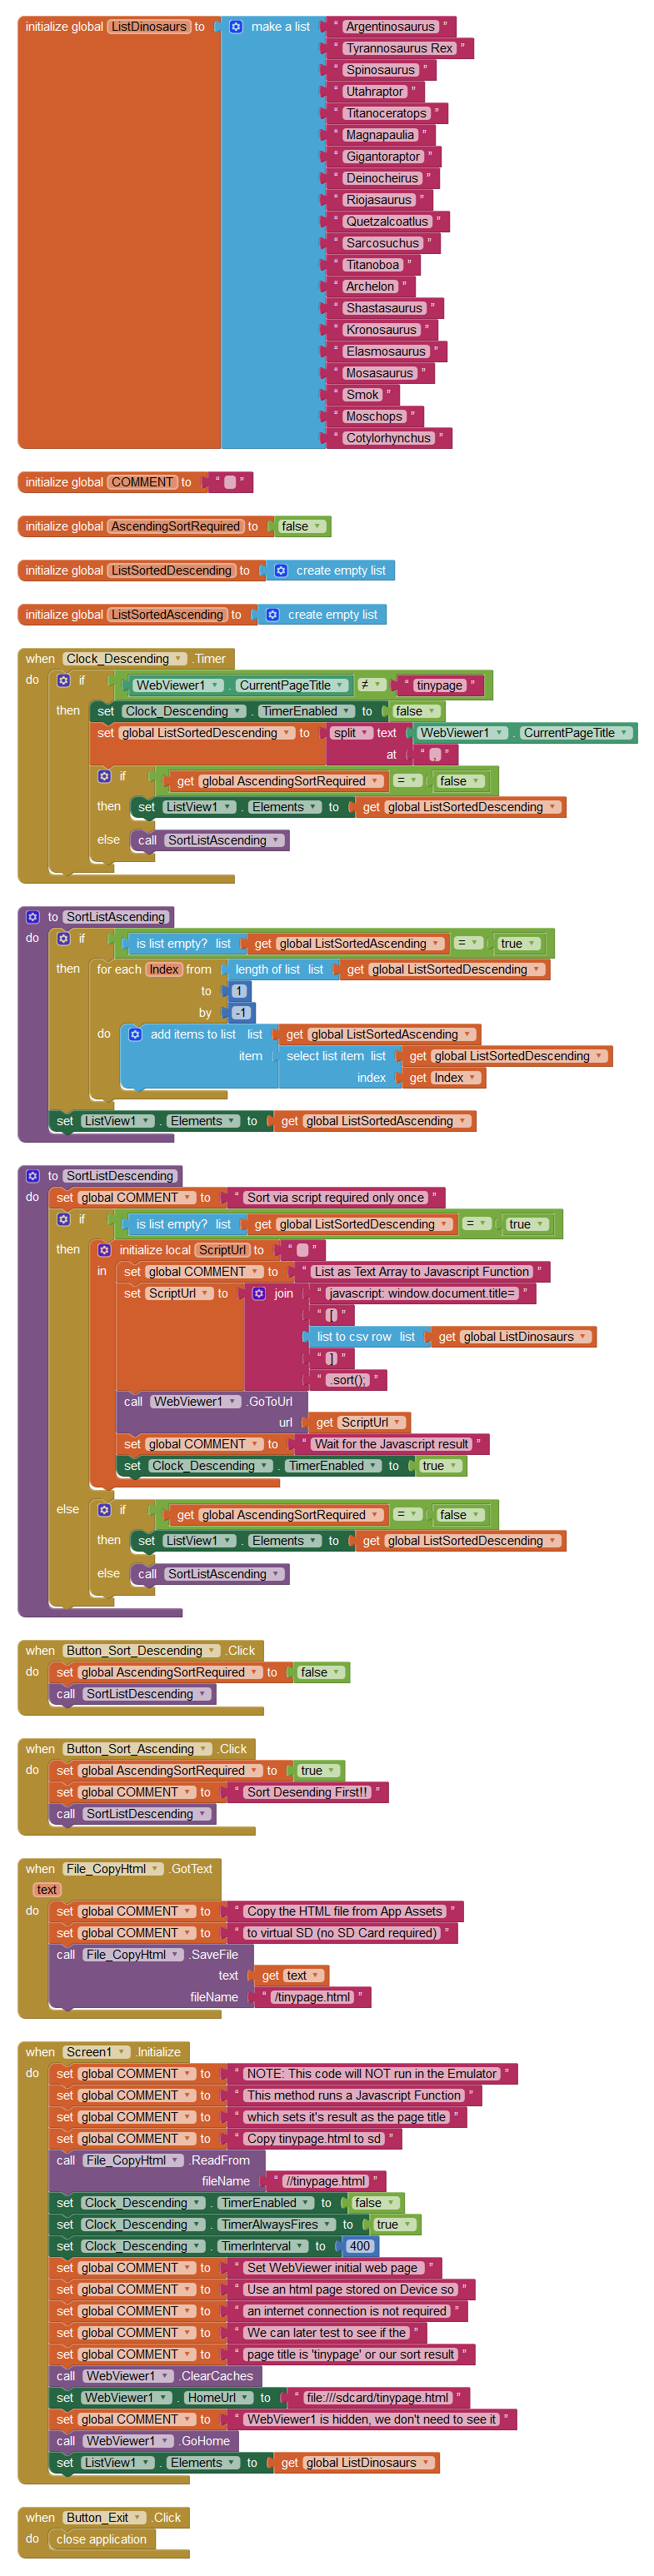
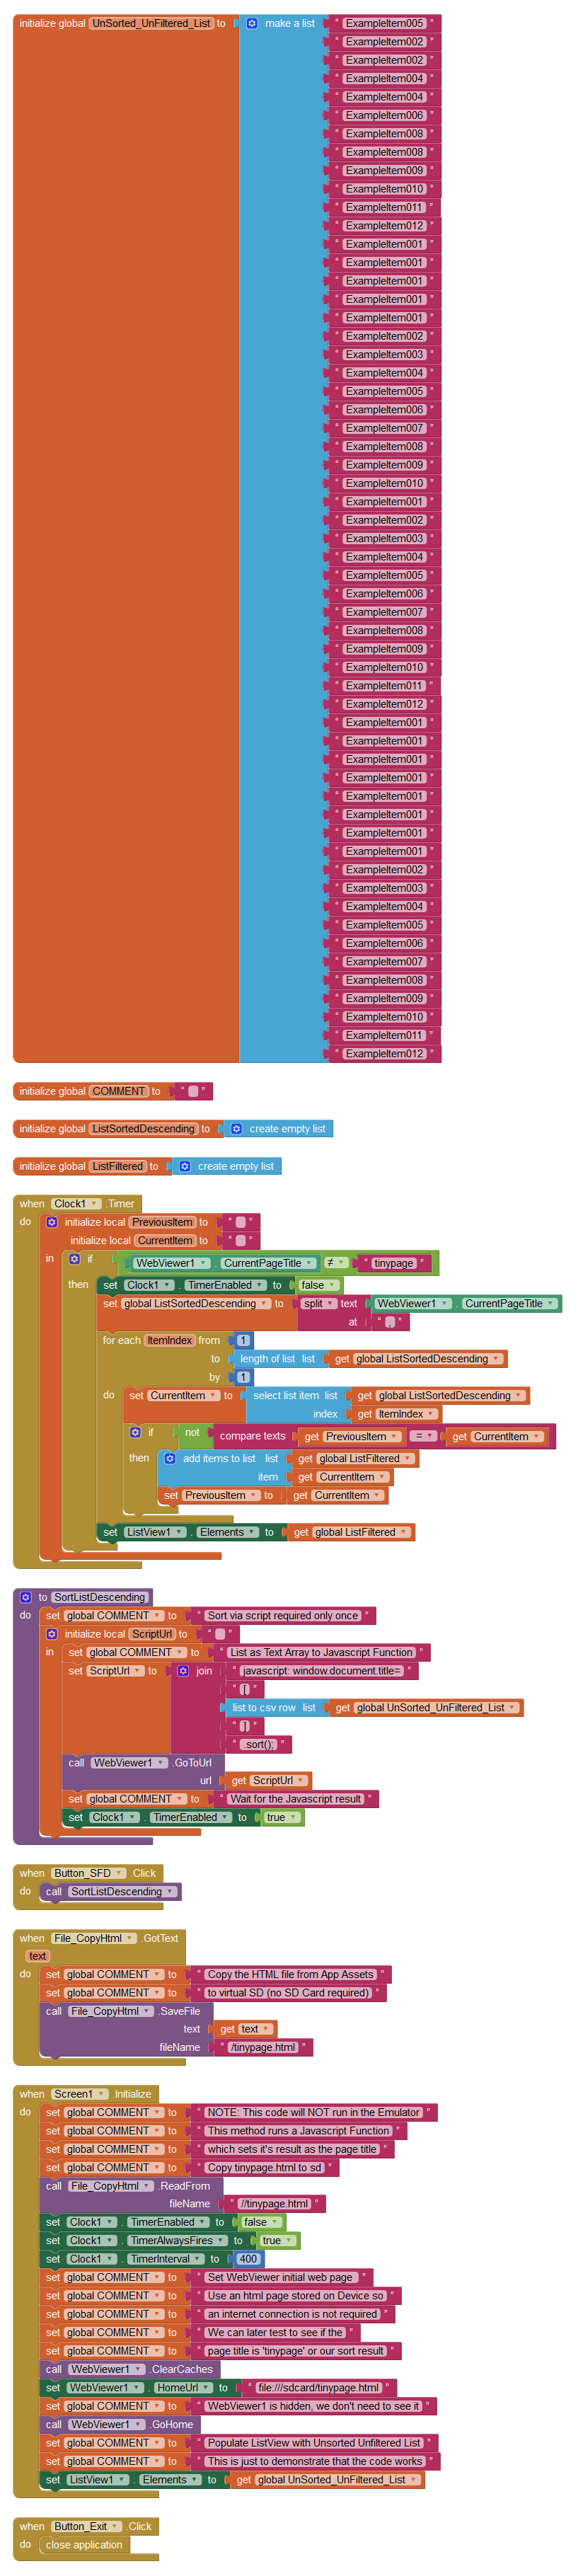
Allow the User to Sort ListView Items (Rows) Descending or Ascending.
The code uses a Javascript Sort function for a fast and accurate sort. In this example, the Items must be App Inventor text, not numbers.
This code snippet is a self-contained mini App. The Javascript method used was derived from Taifun's idea: How to sort a list using the WebViewer(!)
You can modify the code to suit your needs.
Free DownloadGUI
Blocks
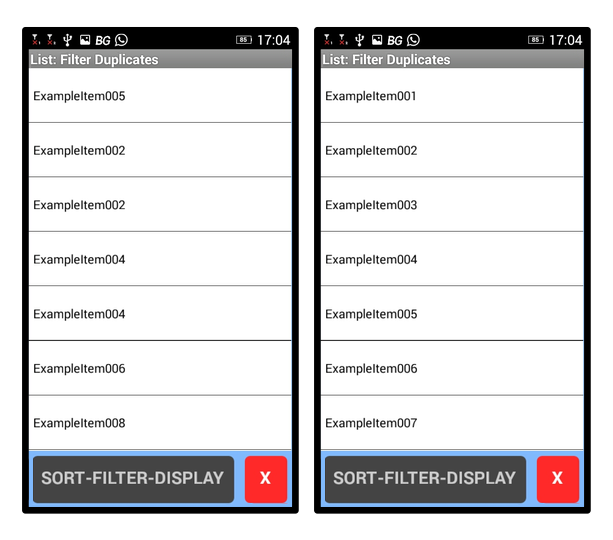
Typically, sorting and filtering-out duplicates would be done before displaying the List, but it can also be done at run time at the behest of the User.
The code uses a Javascript Sort function for a fast and accurate sort, followed by a simple filter routine using the App Inventor "compare texts" Block. In this example, the Items must be App Inventor text, not numbers.
This code snippet is a self-contained mini App. The Javascript method used was derived from Taifun's idea: How to sort a list using the WebViewer(!)
You can modify the code to suit your needs.
Free DownloadGUI
Blocks
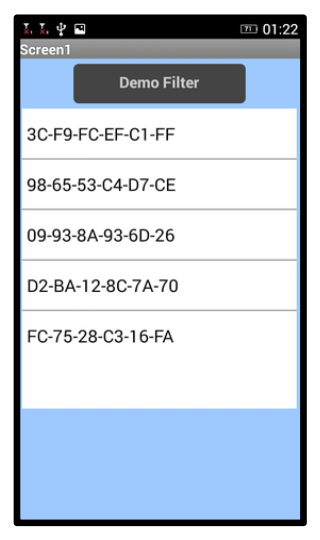
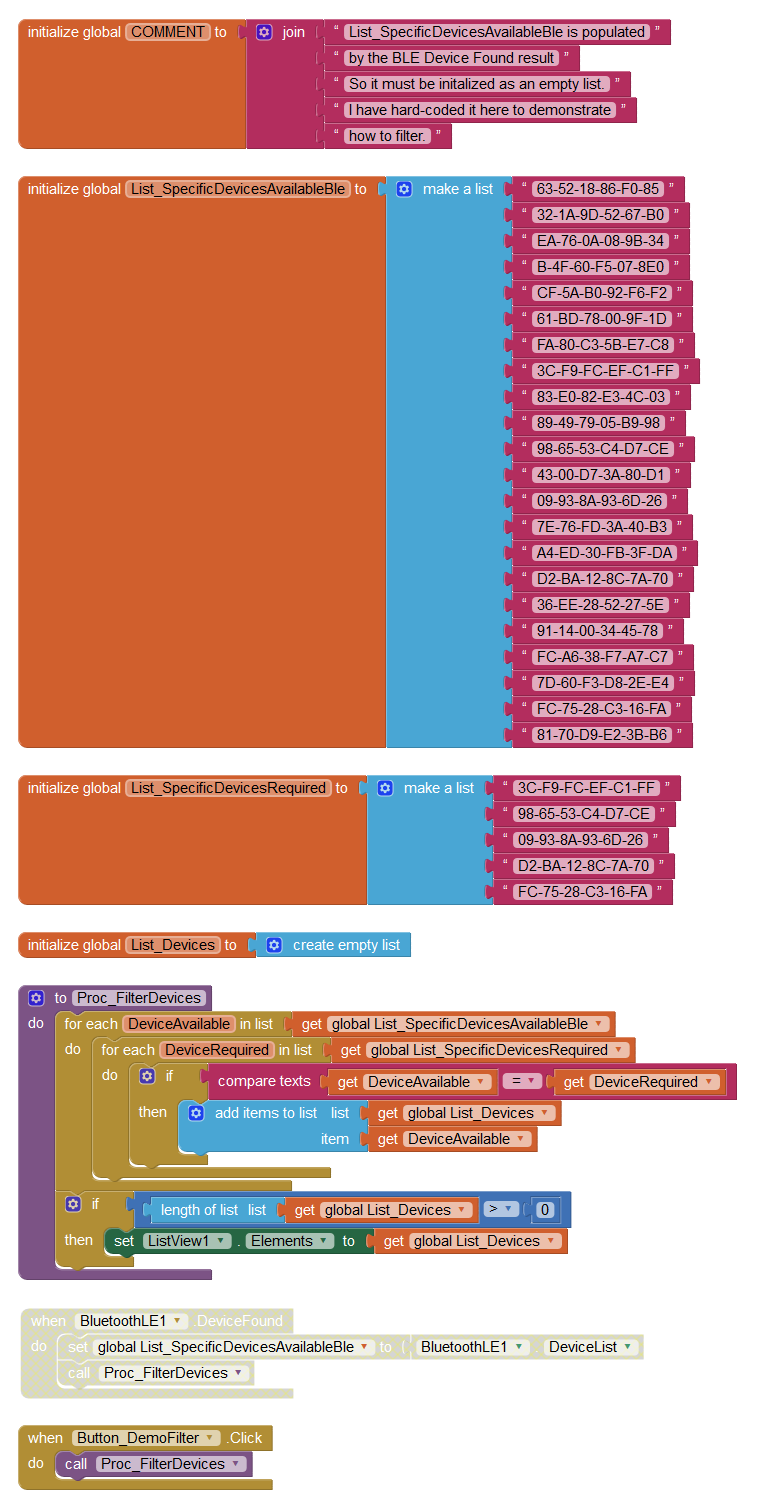
In this example, the App receives a large list of Bluetooth devices available, but from that list, we wish to display a sub-set of only specific devices of interest. We filter the list in this way because at any given time, not all of the devices of interest may be available.
This code snippet is a self-contained mini App, using a fake list to represent a list of Bluetooth devices found. The disabled (greyed-out) Block shown below would generate a real-world devices list. We "hard-code" the short list of devices we actually require for display.
You can modify the code to suit your needs.
Free DownloadGUI
Blocks
Copy any or all Blocks to the BackPack, then paste into your own Project - no extension required!
Free DownloadBlocks
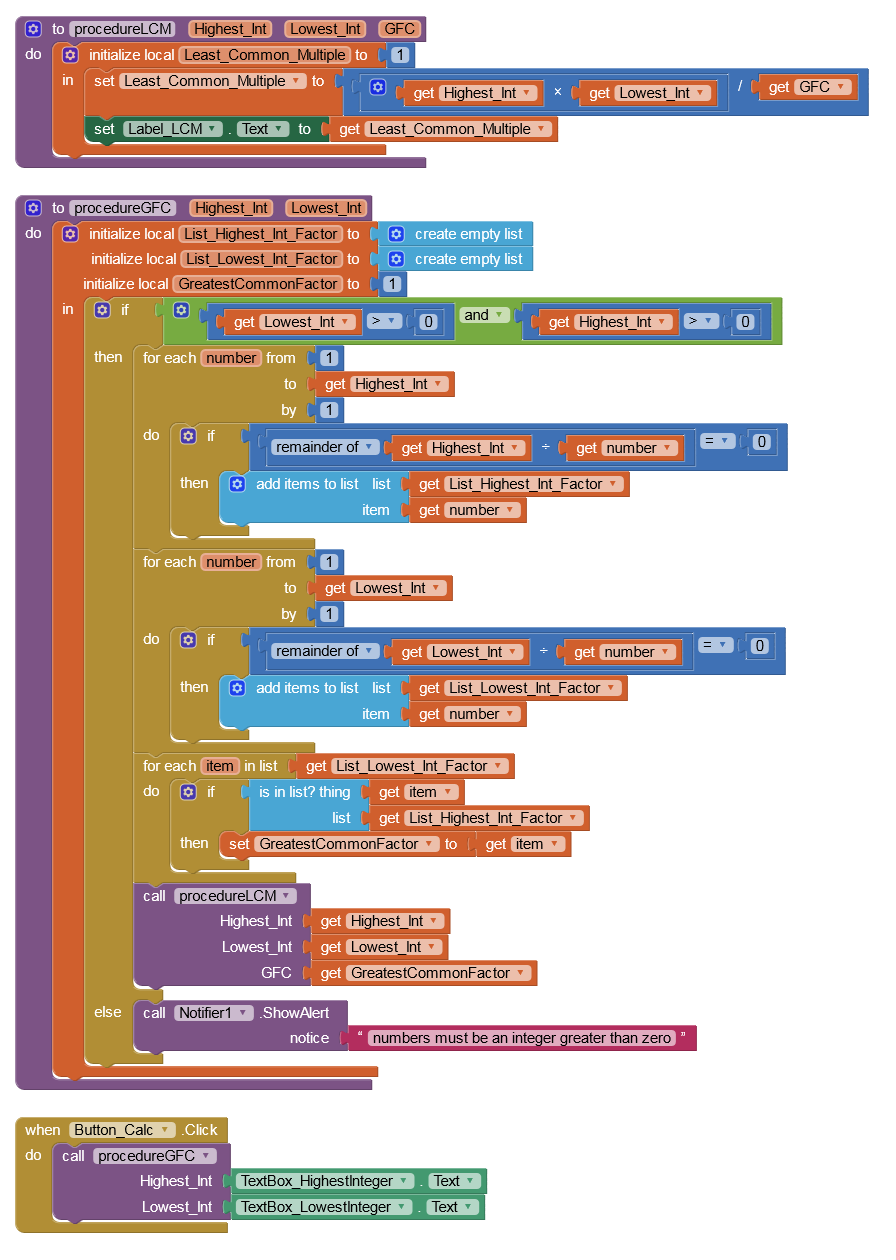
A simple way to determine the least common multiple of two integers. This method uses the Greatest Common Factor, useful in it's own right and therefore presented as a seperate Procedure.
This code snippet is a self-contained mini App. You can modify the code to suit your needs.
Free DownloadGUI
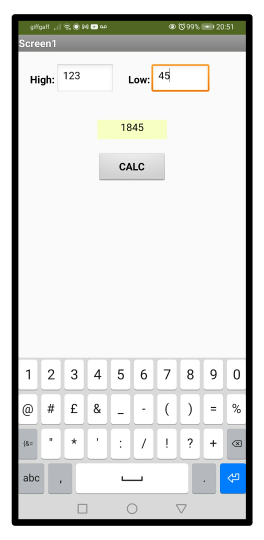
Blocks
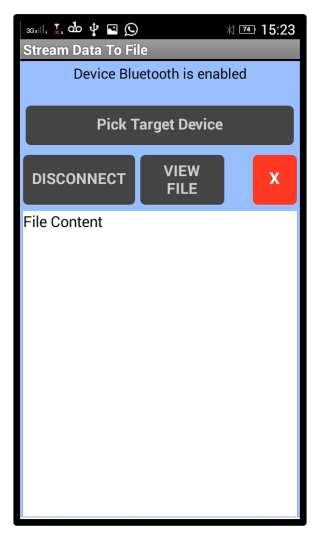
Save a data stream, for example sensor values delivered to the App via Bluetooth or WiFi from a Microprocessor.
This code snippet is a self-contained mini App. It uses Bluetooth Classic as an example but any source of streaming data can be handled in a similar way.
You can modify the code to suit your needs.
Free DownloadGUI
Blocks

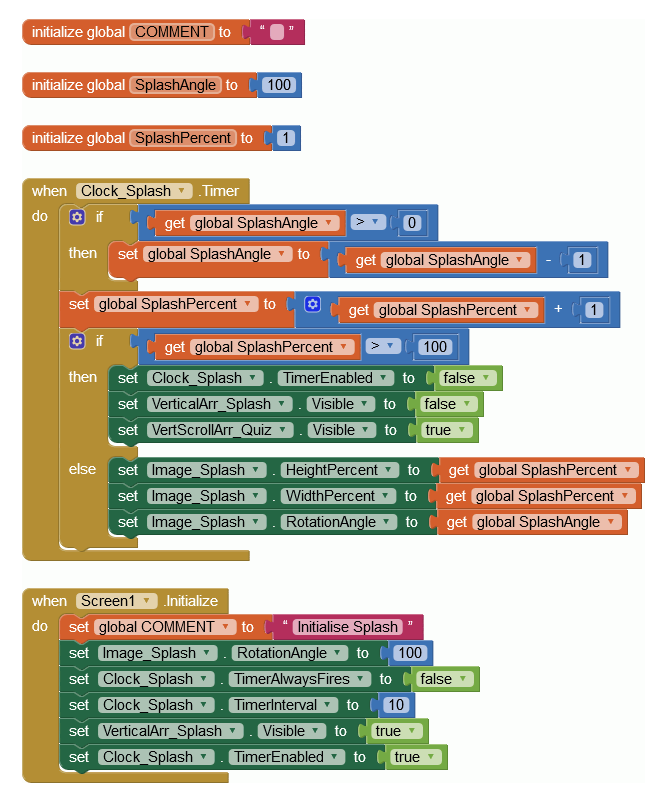
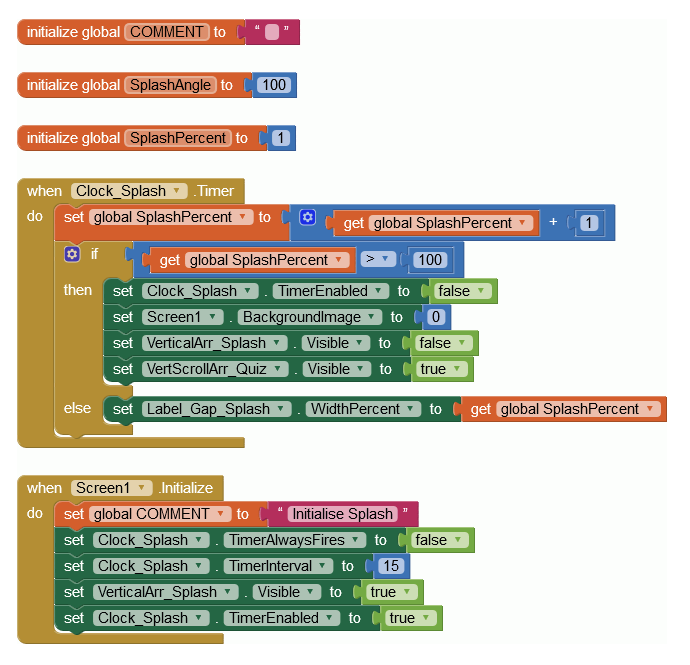
Display a Splash Image when the User runs your App
This code snippet is a self-contained mini App. On Screen1 there are two Vertical Arrangements, a 'fixed' one for the Splash and a scrollable one for Screen1's App components
You can modify the code to suit your needs.
Blocks
Video Free DownloadDisplay a Splash Image when the User runs your App
This code snippet is a self-contained mini App. On Screen1 there are two Vertical Arrangements, a 'fixed' one for the Splash and a scrollable one for Screen1's App components
You can modify the code to suit your needs.
Blocks
Video Free Download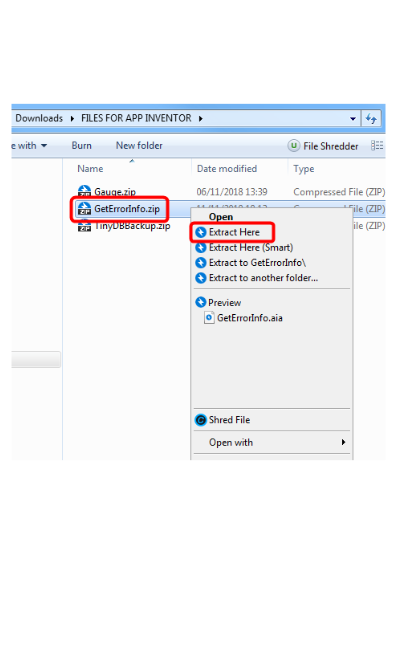


 Play
Play 